WordPress is one of the best content platforms to build any type of website on. Be it an affiliate blog, business website or ecommerce store, WordPress provides flexibility, extensibility, speed and full control over your website.
With more than 60% of the internet being powered by WordPress, it’s these, and many other advantages, that make it the best website building platform available.
In this step-by-step training guide, I’ll show you how to build a website with WordPress in 10 easy steps. The steps in this tutorial show you how to install WordPress and build any type of website, on your own high-performance VPS (virtual private server).
Step 1: Register your Custom Domain Name
If you already have a domain name, then skip this step and jump to step 2.
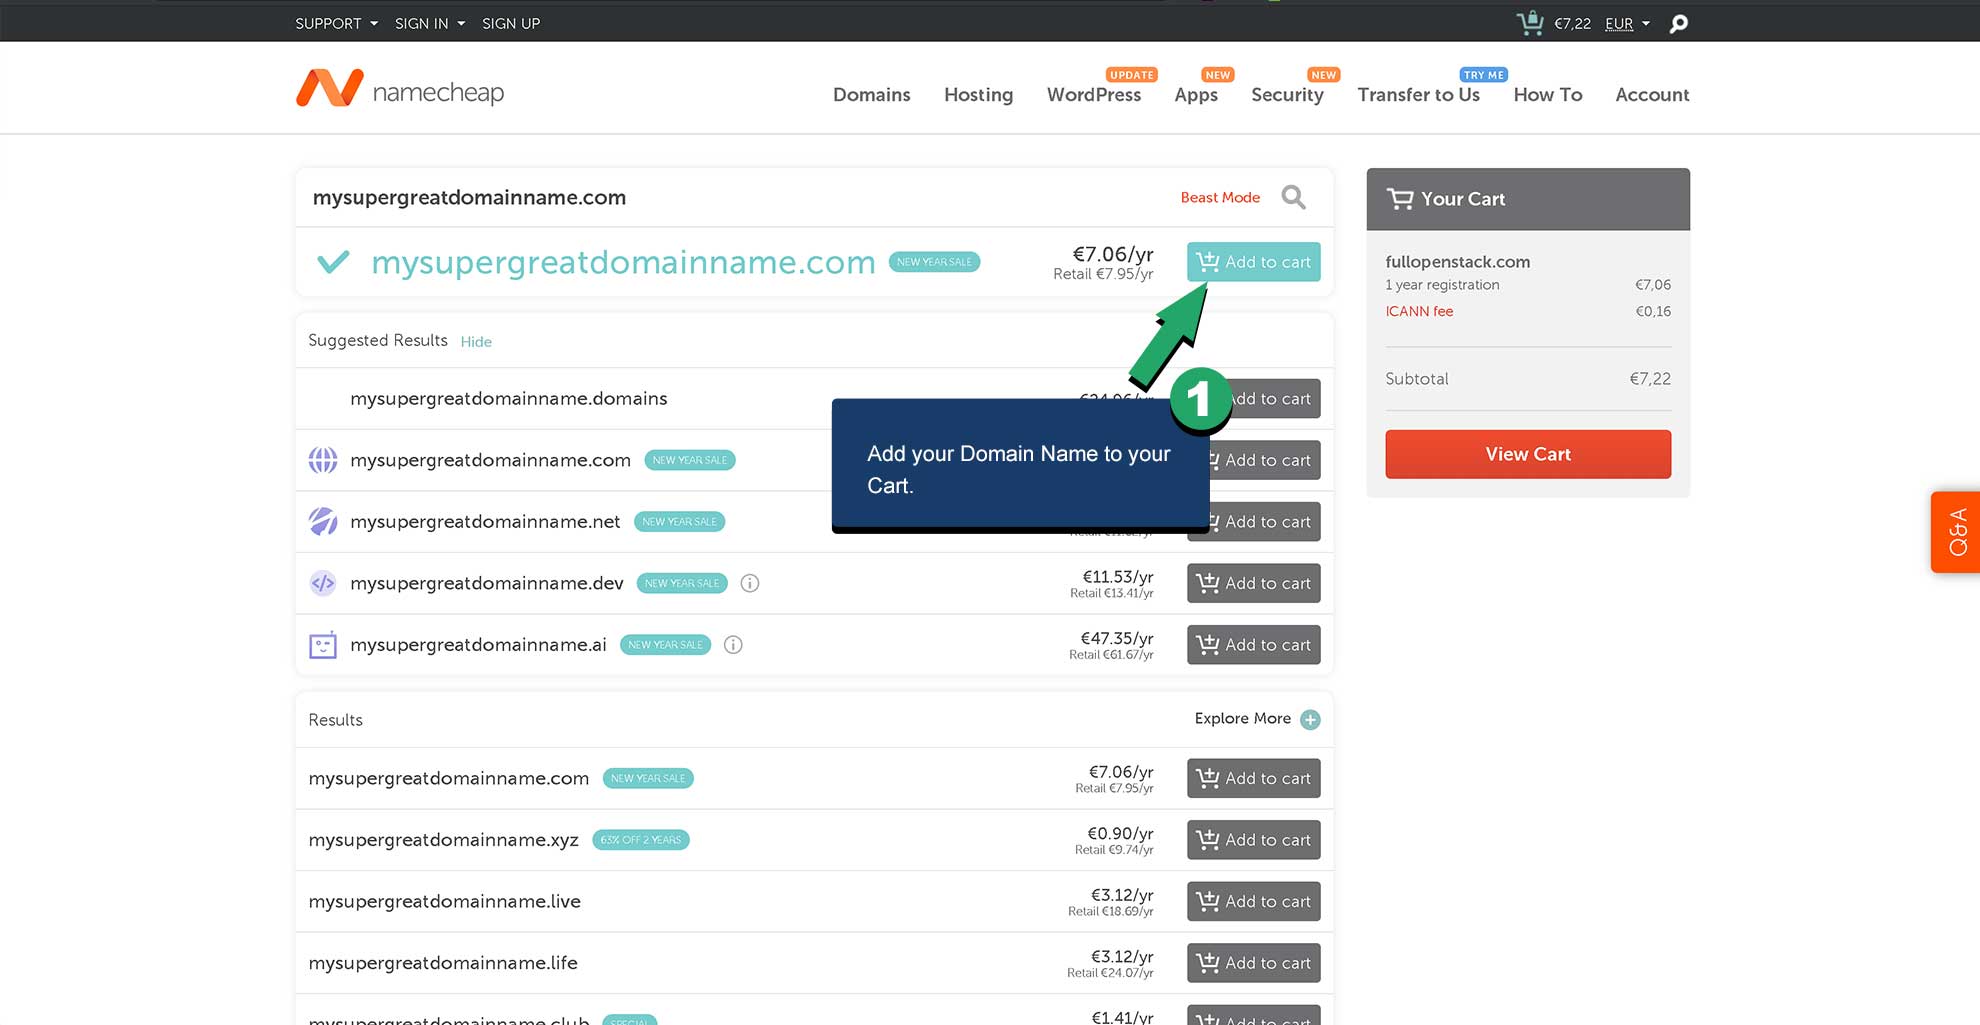
Before you can create your WordPress site, you’ll need to register a domain name. Look for an available domain name that fits your business strategy, mission, and vision. The difficulty with finding a great name is that many are already taken. It can be difficult to find a domain name that covers all your needs.
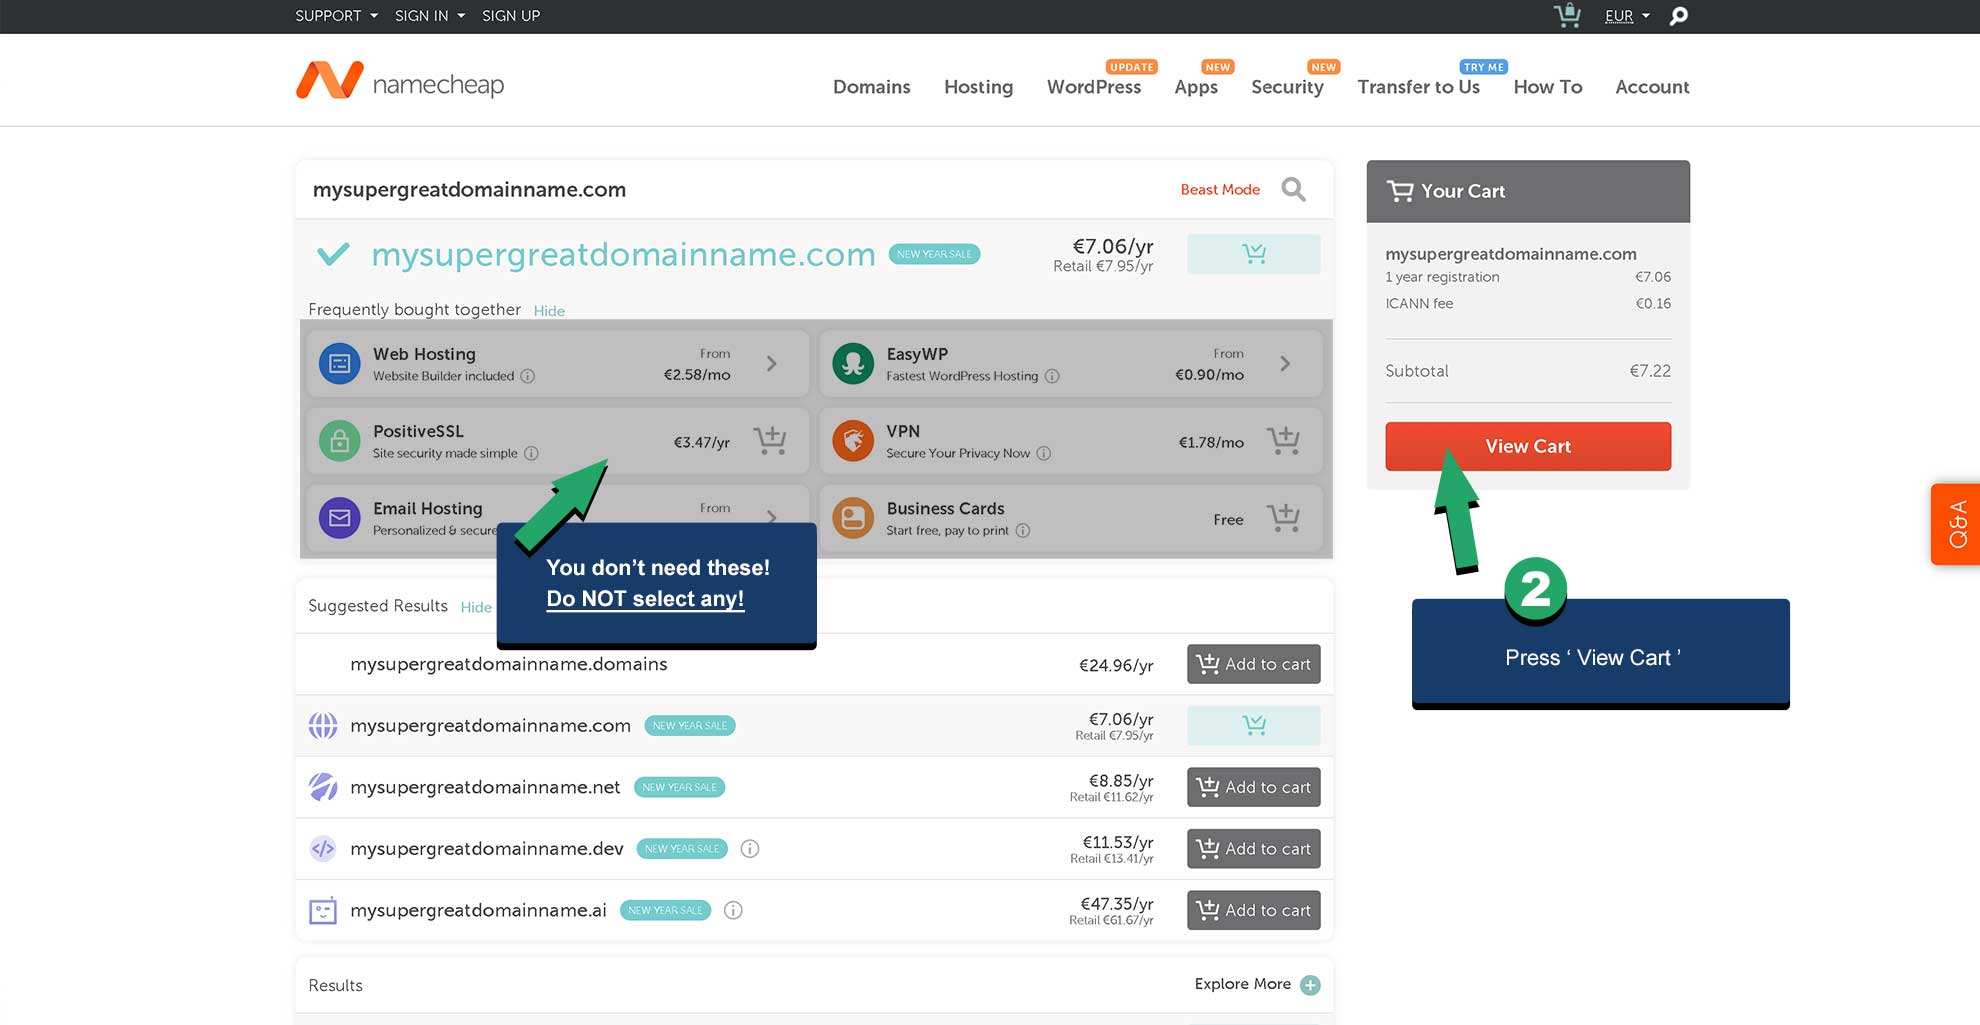
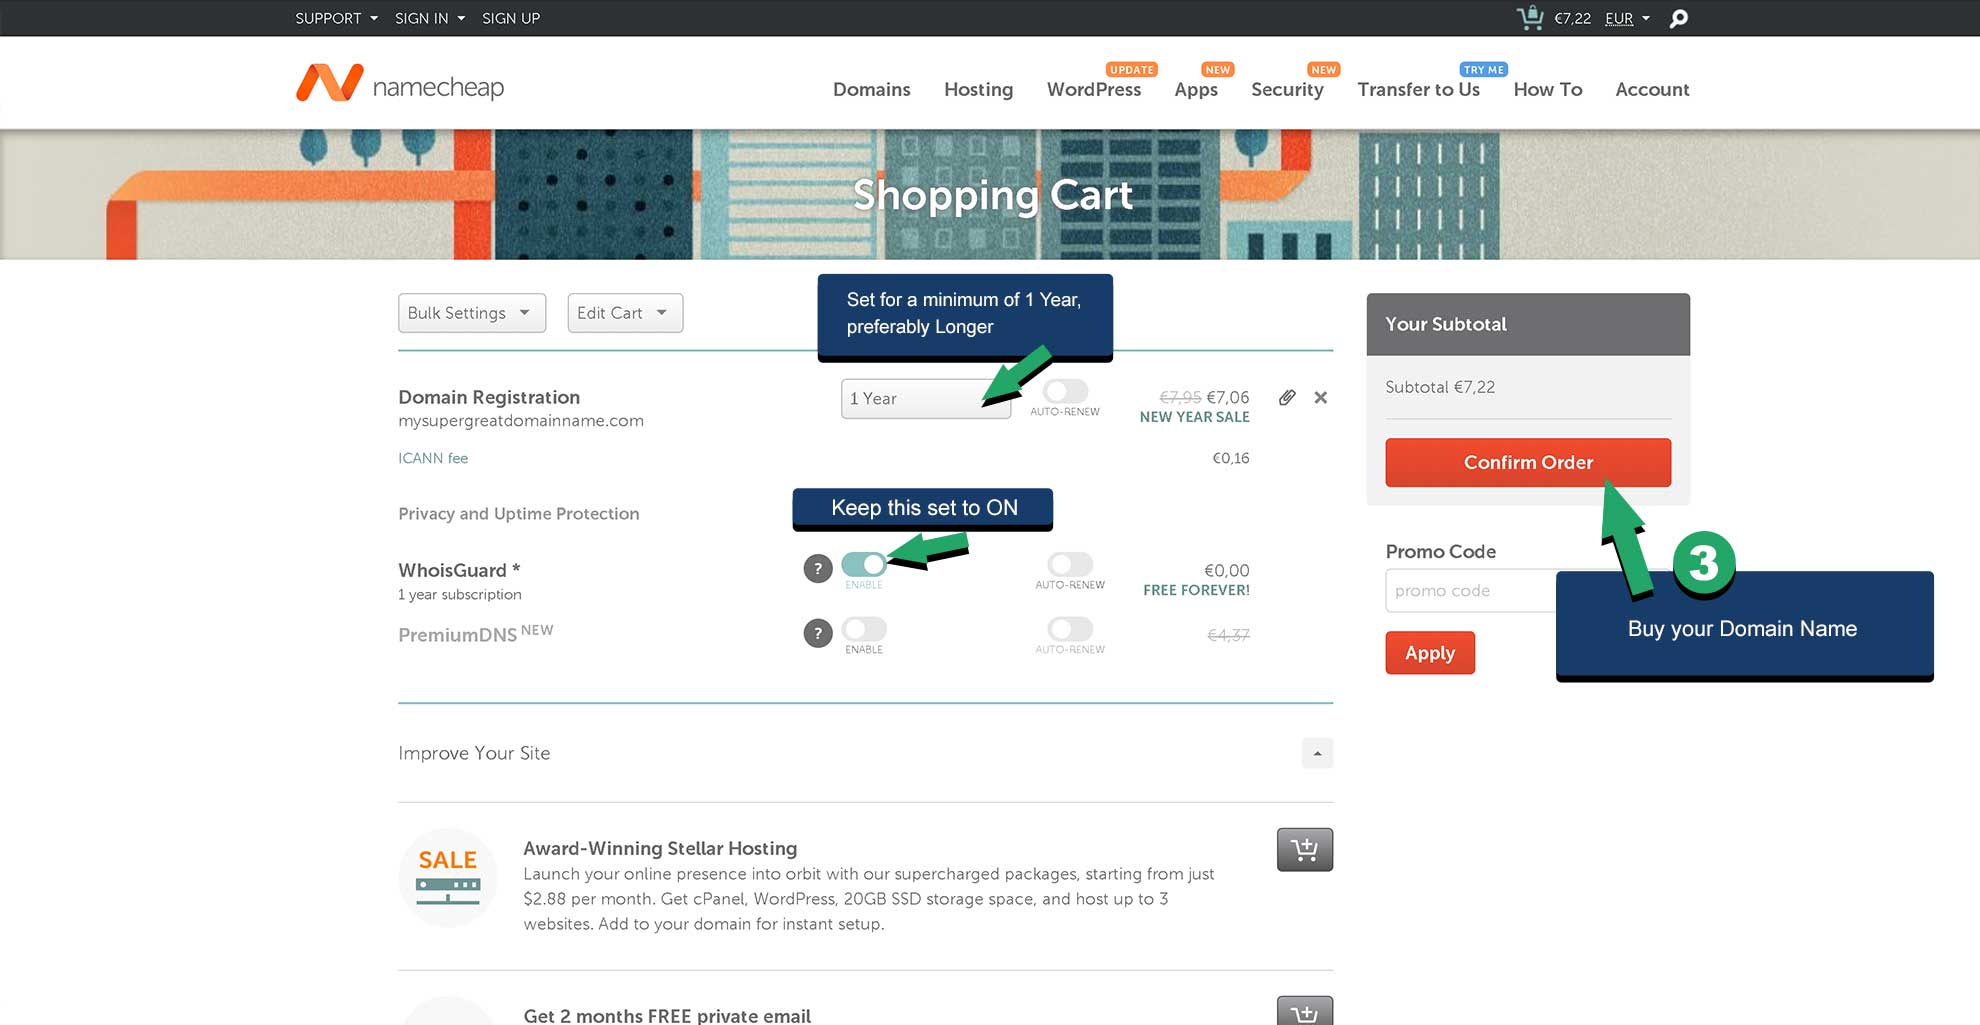
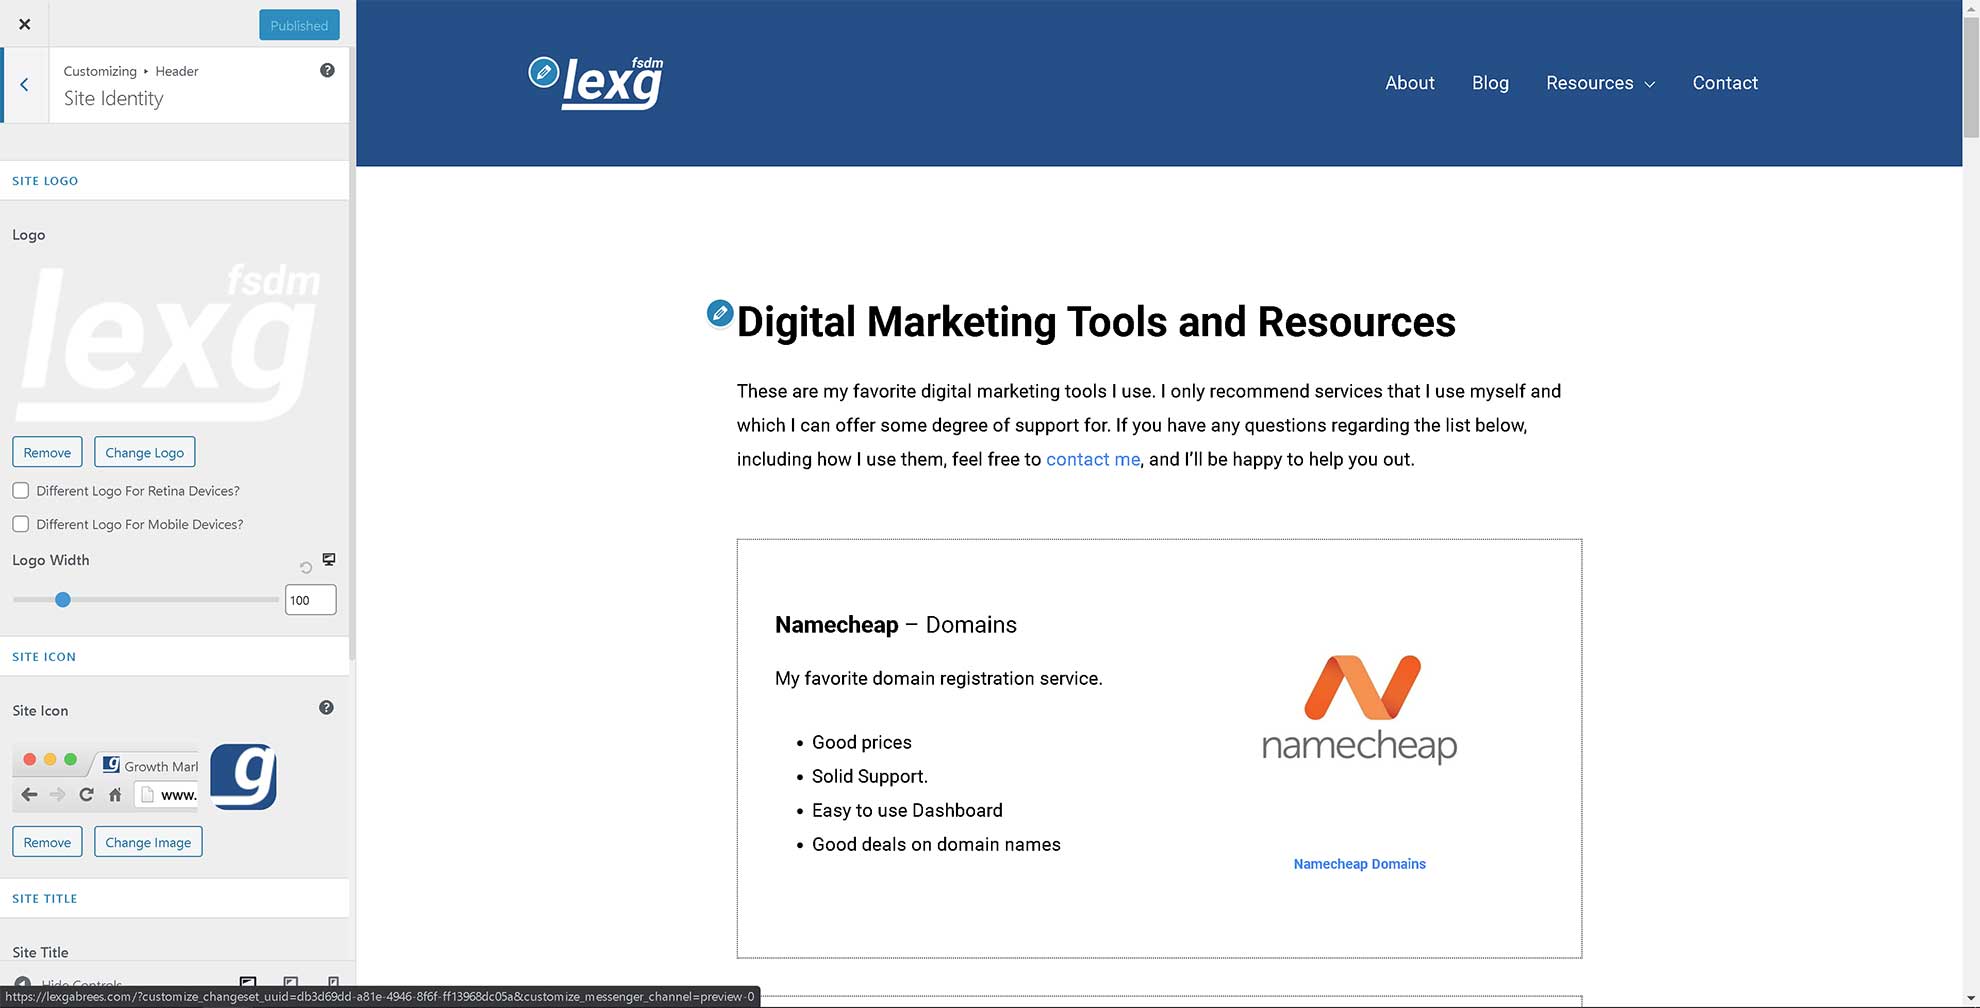
Once you’ve decided on a suitable domain name and it’s still available, you should immediately register it. If you don’t, you risk the domain name being snatched by someone else. I use Namecheap for all my domain name registrations.
Register your domain name in a few easy steps:
- Go to Namecheap Domains.
- Type in the domain name you’ve chosen (and is available).
- Follow the instructions below.
Step 2: Install WordPress / Woocommerce on a VPS
After registering your domain name, you’ll need a high-quality web hosting plan. A web hosting provider should be reliable, have good support, and offer the best performance at an affordable price. I recommend you get a VPS plan (virtual private server) with at least 1 CPU and 1 Gigabyte of memory to start out with.
I use Cloudways VPS hosting for all my client projects. They offer great performance, and you can install WordPress with 1 click. Besides that, you can quickly scale your plan up with just another click. If you want to know more about Cloudways, then have a look at my Cloudways VPS hosting review.
Sign up for your VPS hosting plan:
- Sign up for a trial account on Cloudways VPS Hosting.
- Use the coupon ‘ LEXG10 ’ to get a 10% discount during the first 3 months.
- Follow the instructions below.
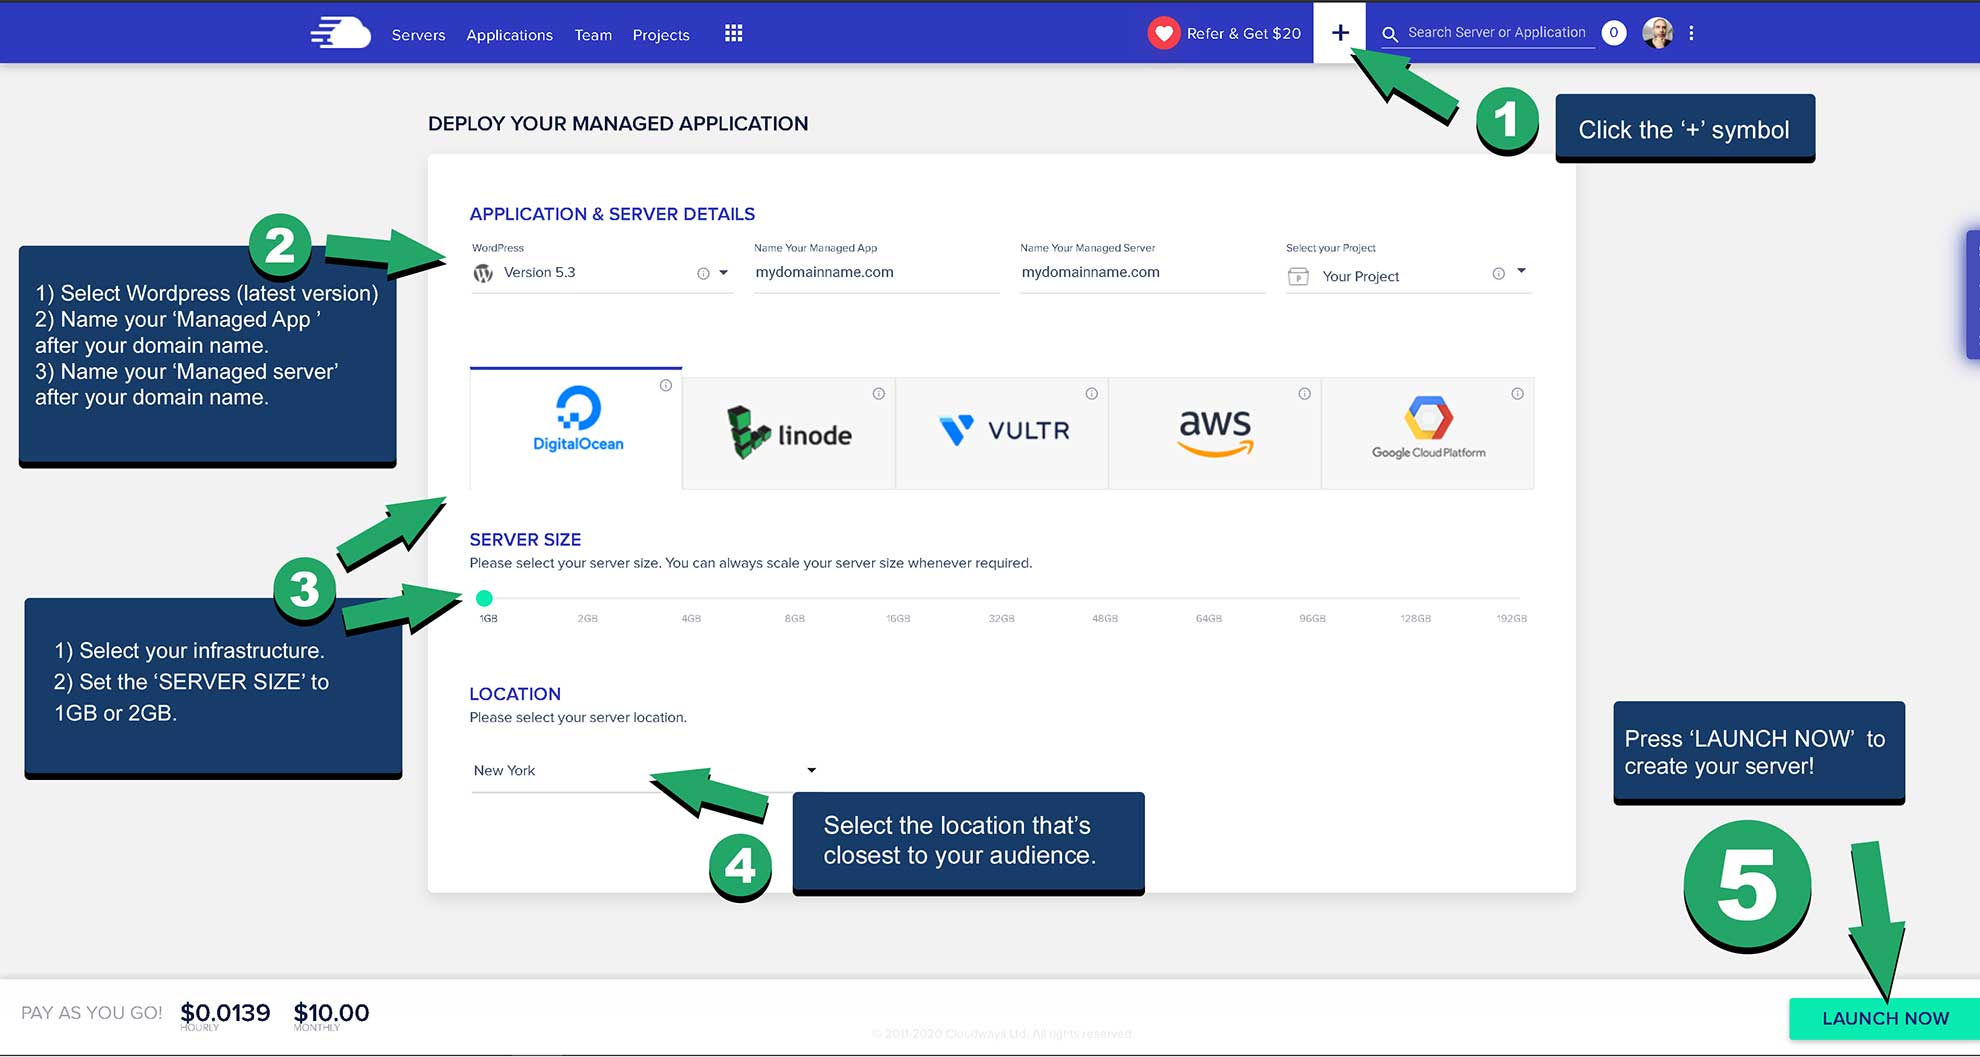
After creating your server (which automatically installs WordPress), you need to connect your new domain name to it. This is done through the DNS settings of your domain name registrar. In our case, this is Namecheap.
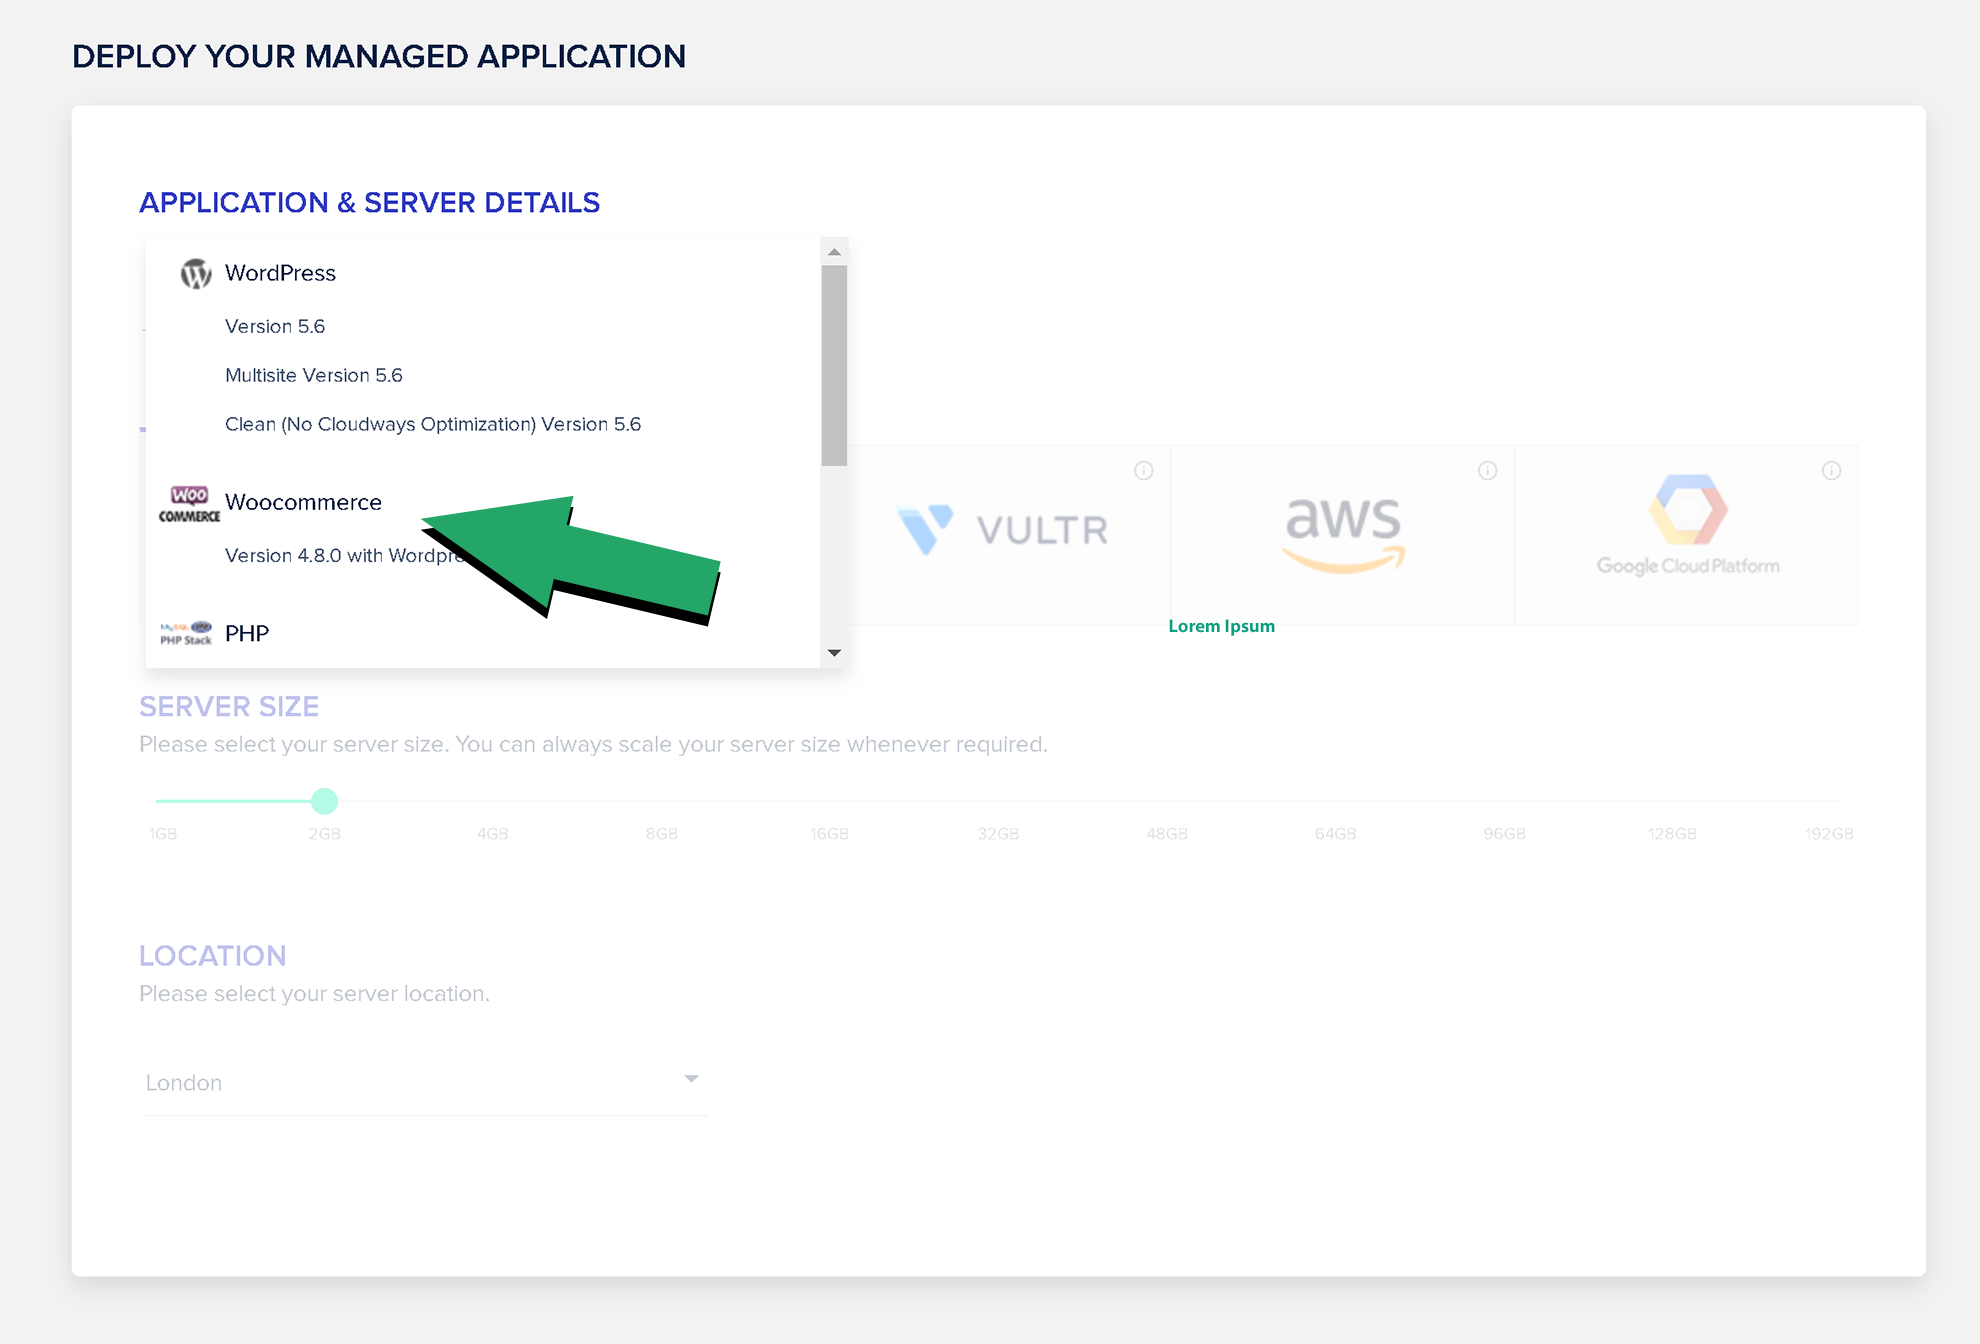
Installing an eCommerce shop (Woocommerce)
If you’re planning to build an e-commerce store, then all you need to do is select Woocommerce in this list (instead of WordPress). This will install both WordPress as well as Woocommerce.
Step 3: Configuring the DNS Settings
When you type your domain name into your browser address bar, a request is sent through the web’s domain name system (DNS). This is a system of servers that allows your browser to locate where your WordPress site is hosted. Behind the scenes, a lot happens, but you don’t need to understand exactly what.
To set up the domain name system properly, you’ll need to put the IP address of your web hosting server (Cloudways) into the DNS settings at your domain name registrar (Namecheap). Namecheap will then update the whole DNS, and your domain name will become available to the public through their browsers.
To set up the DNS settings, follow these steps:
- Sign in to your Cloudways account and copy the server IP address
- Sign in to your Namecheap account
- Follow the steps in the images
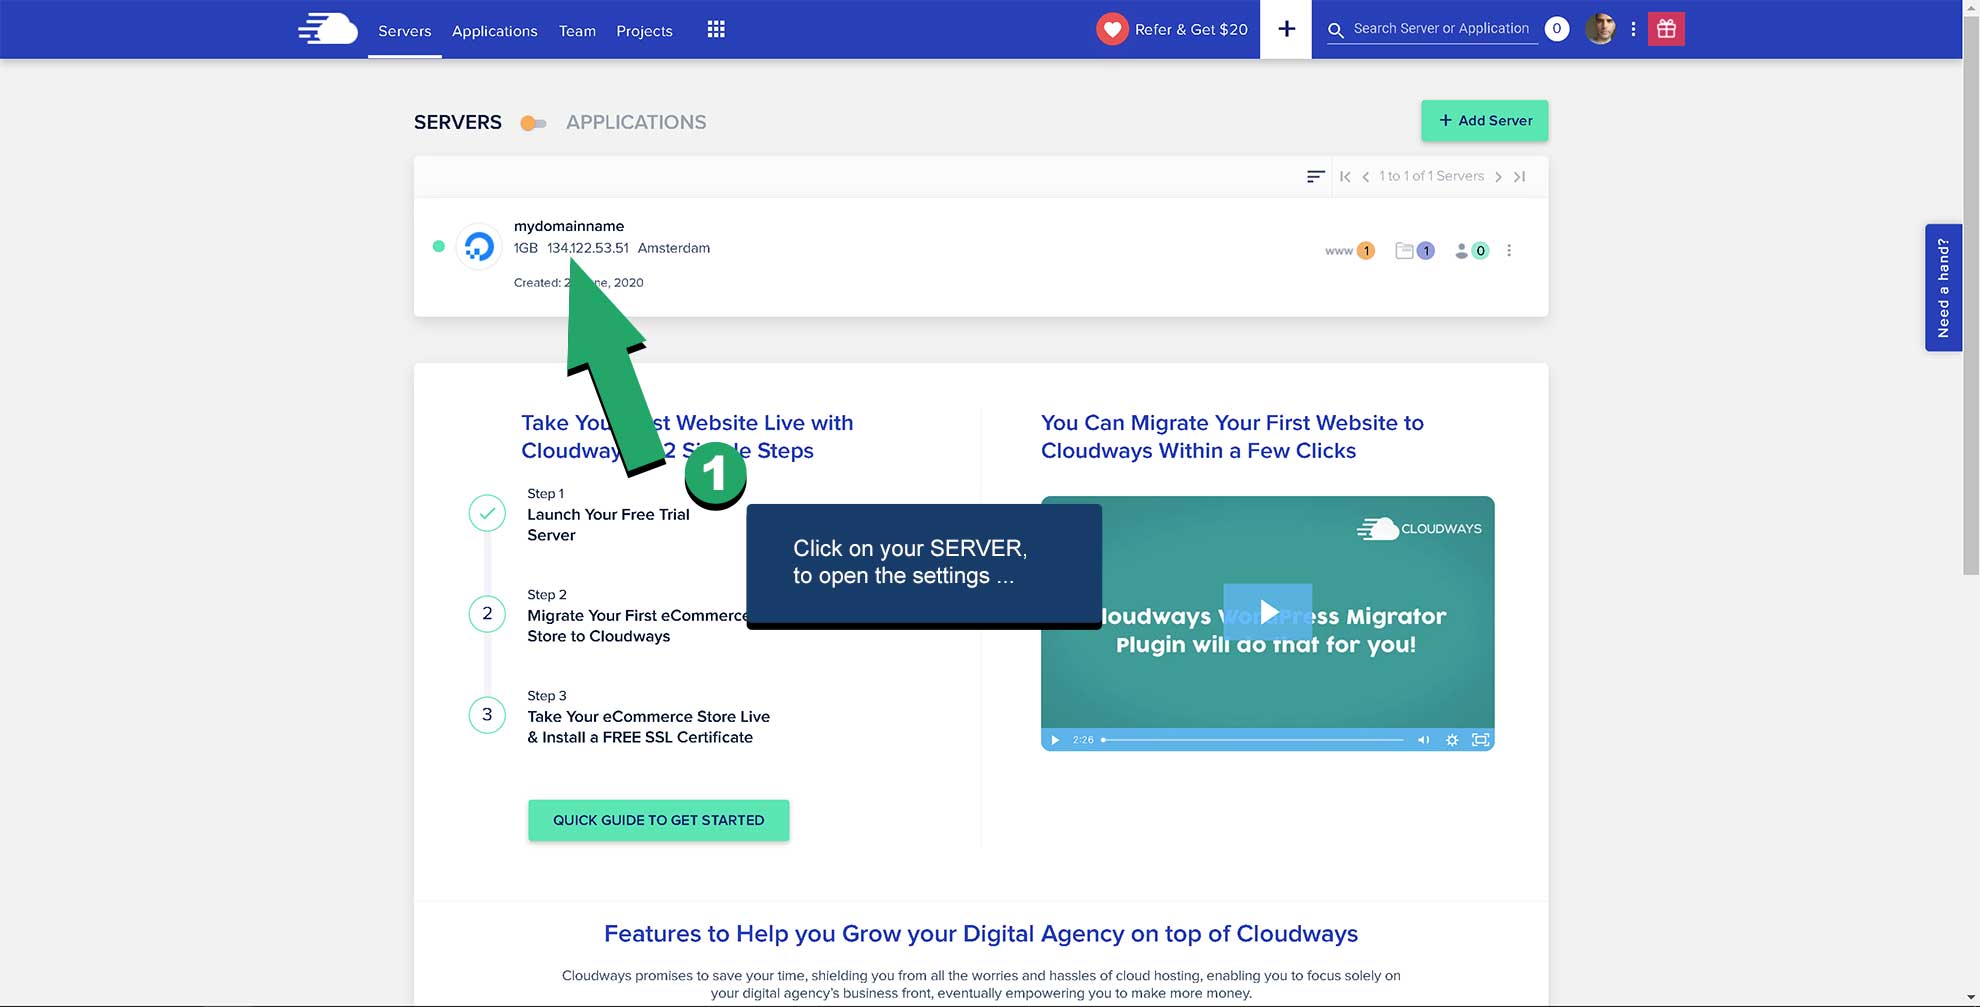
1. Click on the SERVER settings to enter the next screen (or just copy the IP address from here if you like)
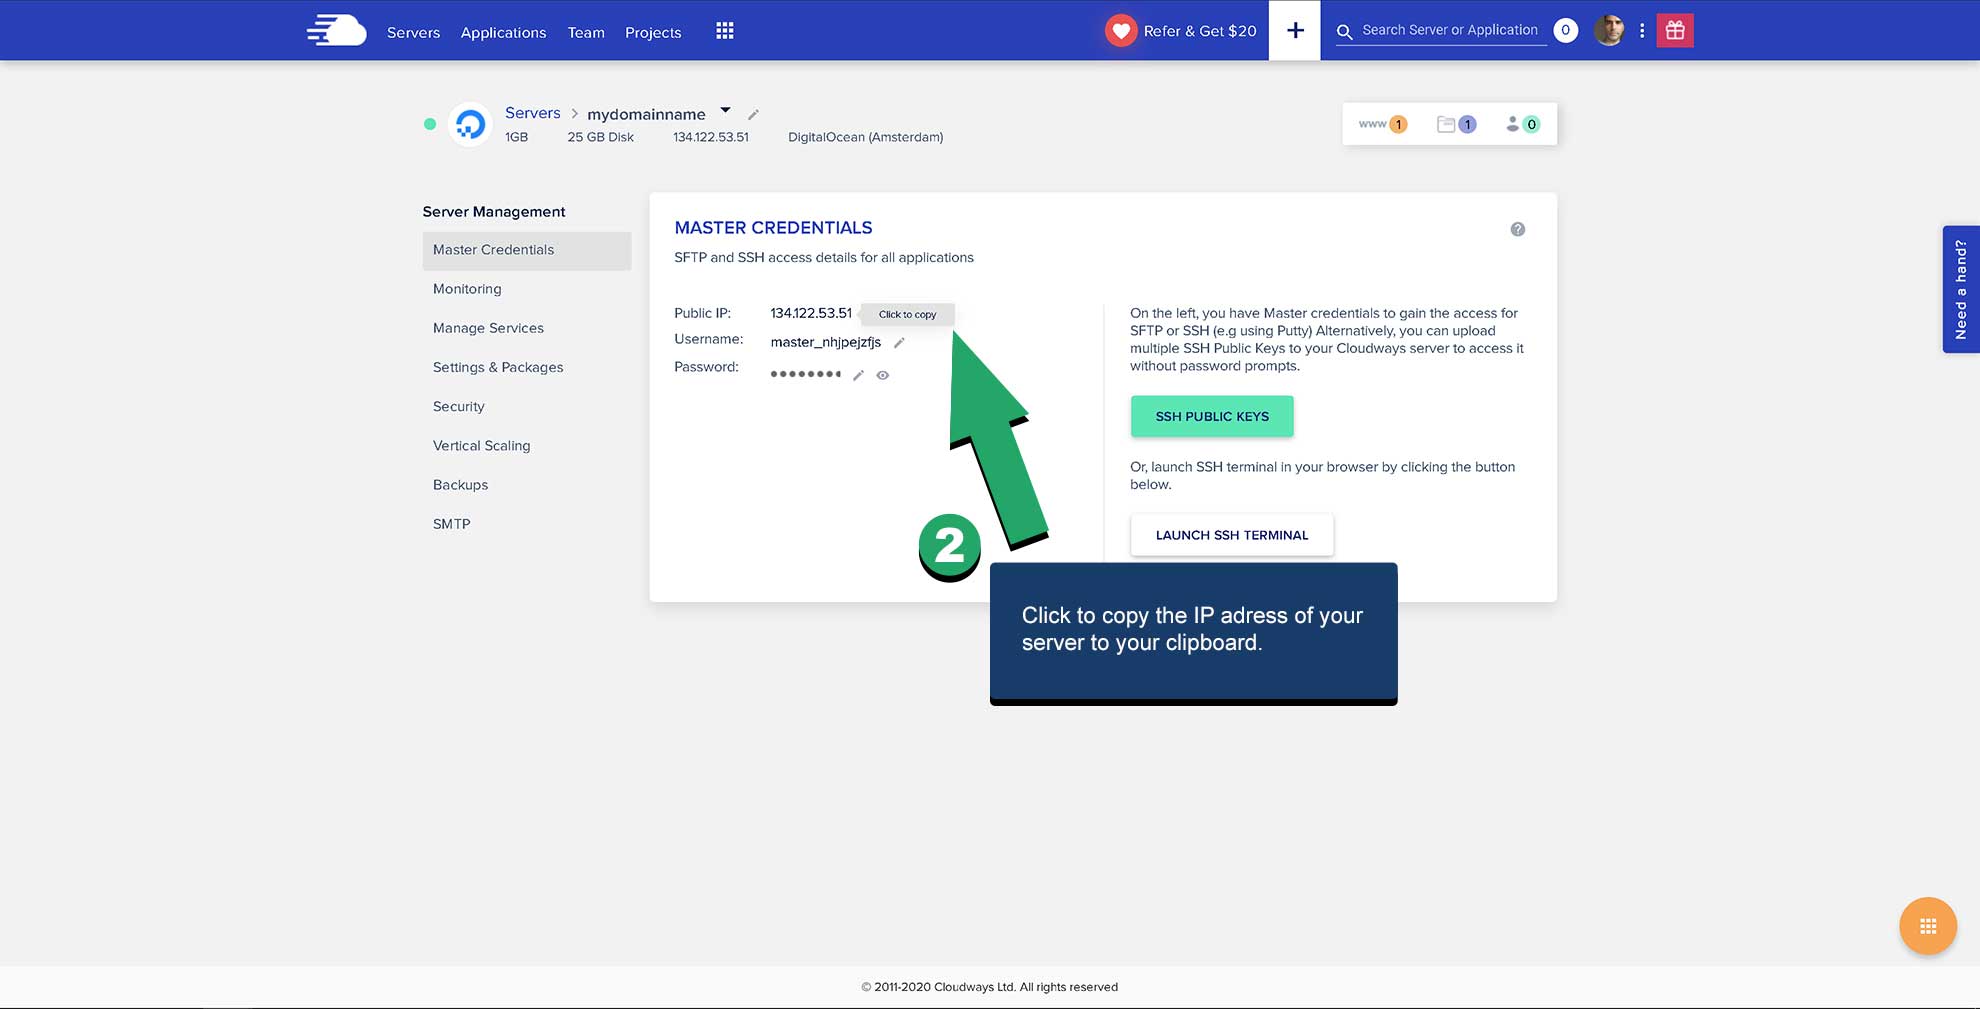
2. Copy the IP address of your new SERVER by clicking the ‘click to copy’ button.

3. Log in to your Namecheap account and click ‘manage’ in your ‘domain list.’

4. Select ‘Advanced DNS.‘
5. Select ‘Namecheap BasicDN.S’
6. Make sure to select the green ‘checkmar.k’

7. Add an ‘A record’, then enter ‘@’as a host and paste your IP address in the Value field.
8. Add another ‘A record’, then enter ‘www’ as the host and the same IP address in the Value field.
Set both TTL fields to automatic.
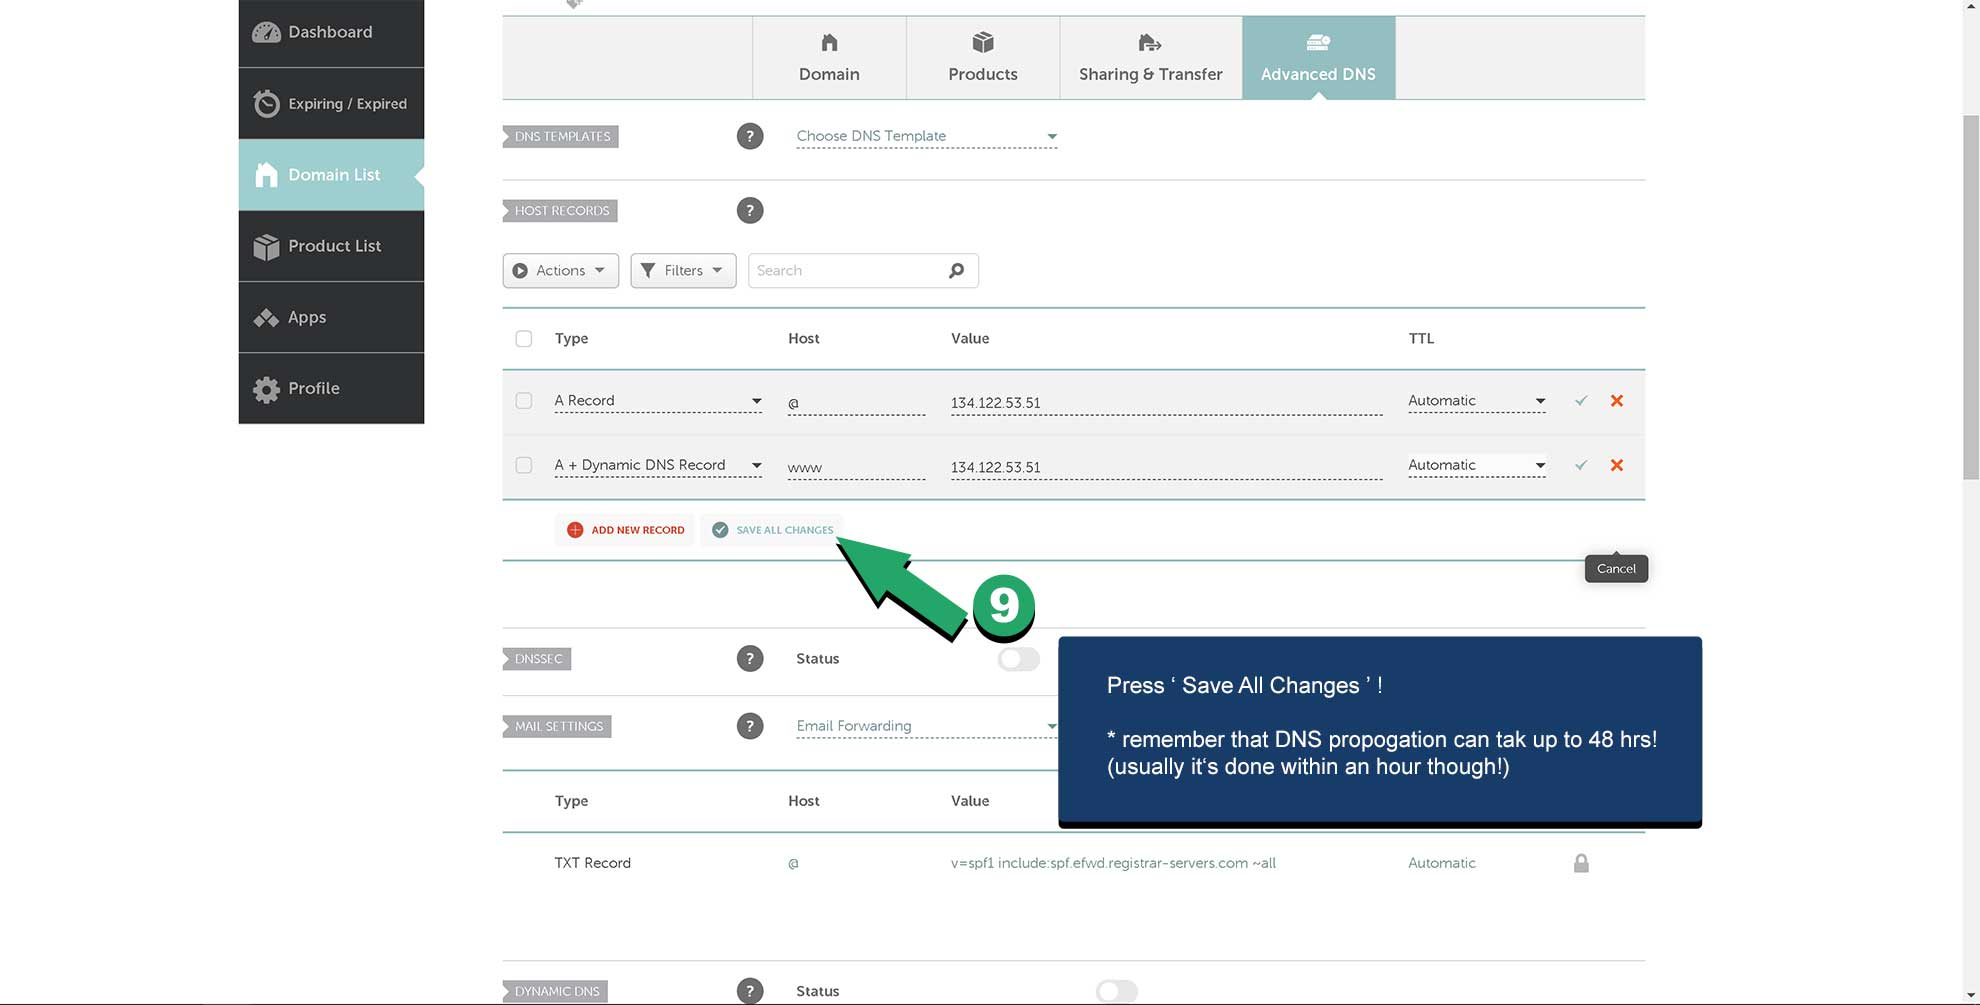
9. Don’t forget to click Save All Changes!
Note: it can take up to 24 hours before the DNS update is completely updated. This is called DNS propagation. Once this is completed, your website will be reachable by typing your domain name into the web browser address bar.
Step 4: Setting up a free SSL certificate
A secure socket layer certificate (SSL) ensures that information sent from your web server to a browser (and vice versa) is encrypted. It means that data such as credit card numbers or personally identifiable information becomes unusable if intercepted by parties with bad intentions. Having an SSL certificate installed is regarded as a best practice by Google. You should set it up immediately.
I use Let’s Encrypt free SSL certificates on all my sites. Luckily, better web hosting providers provide free SSL and installation.
Follow the steps below to set up your free SSL certificate on Cloudways:
- Log in to your Cloudways Account
- Follow the steps in the images below

1. Click on ‘Applications’ *this is different than the ‘Servers’ section.
2. Click your Project / Application to be sent to the settings screen (where you’ll find the SSL option)
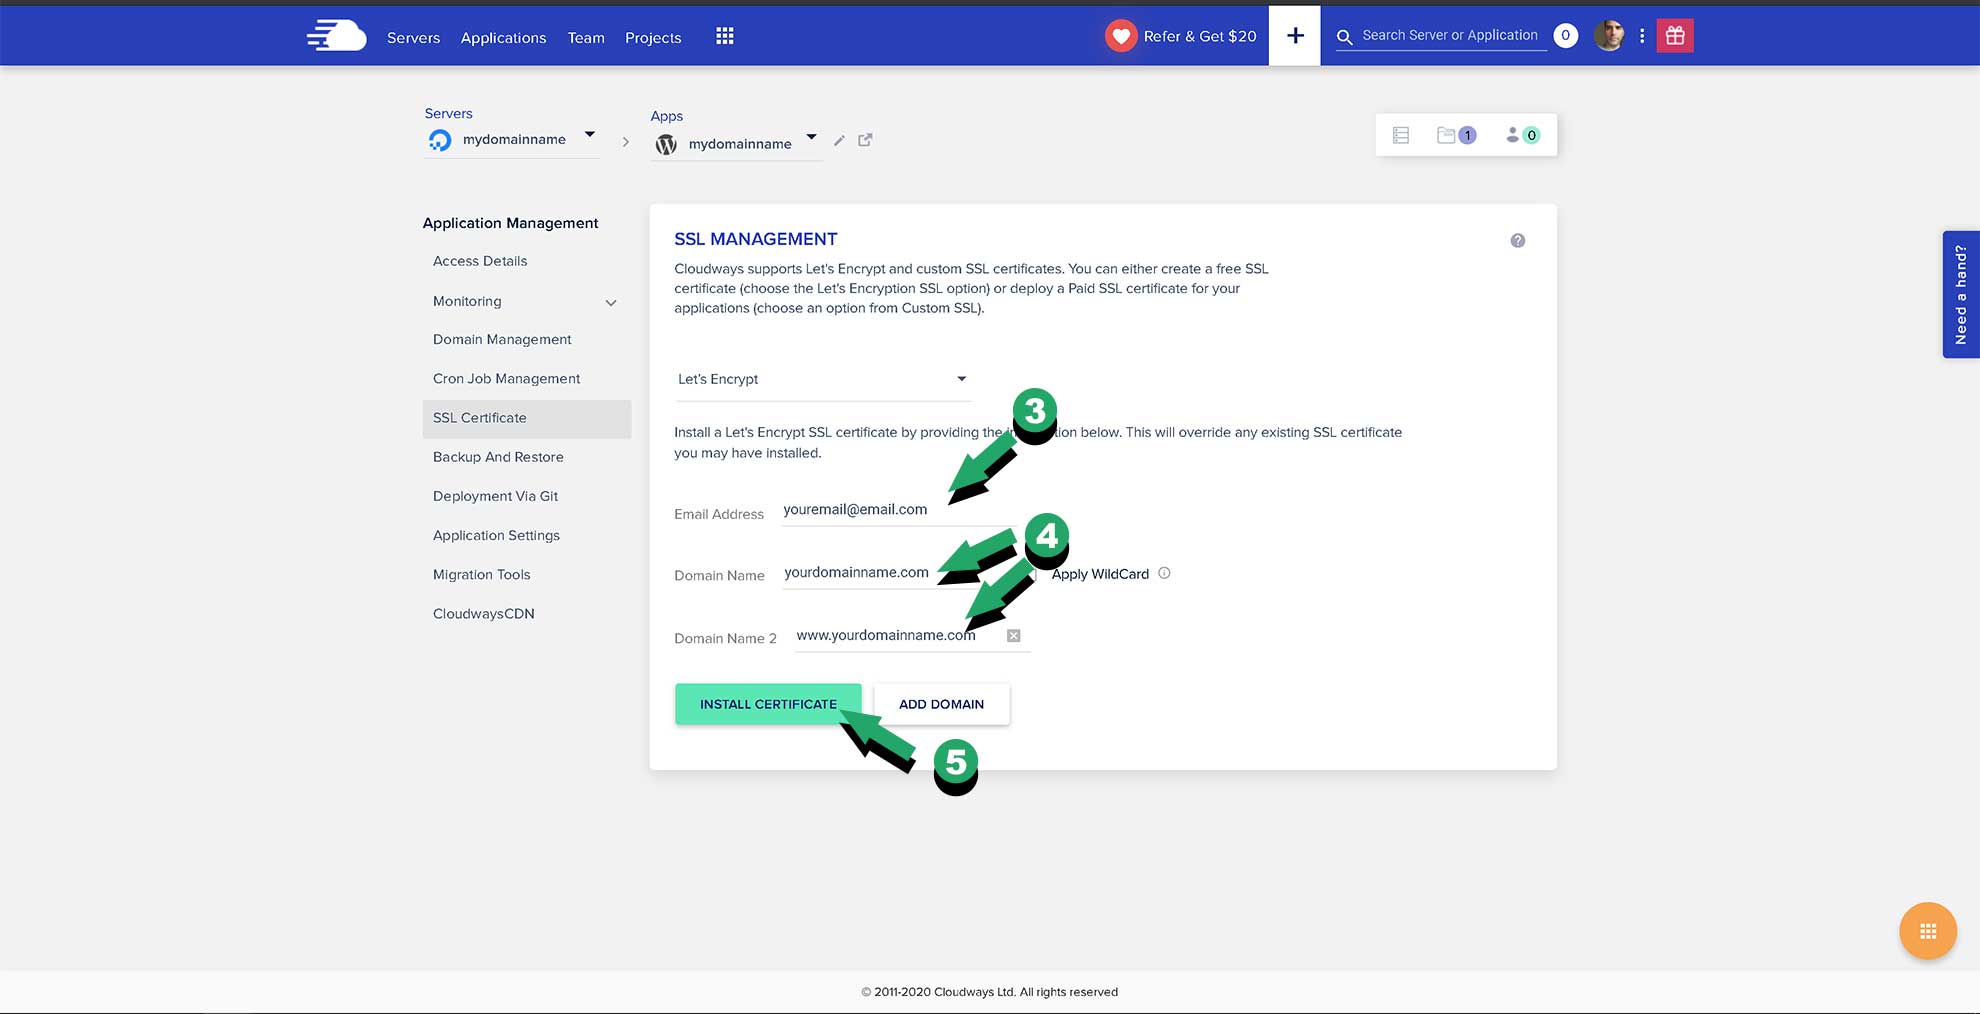
3. Enter your email address (this is where you’ll receive updates about your SSL certificate)
4. Enter your domain name. Also, ‘add the domain’ for your ‘www’ version.
5. Press ‘install certificate’.
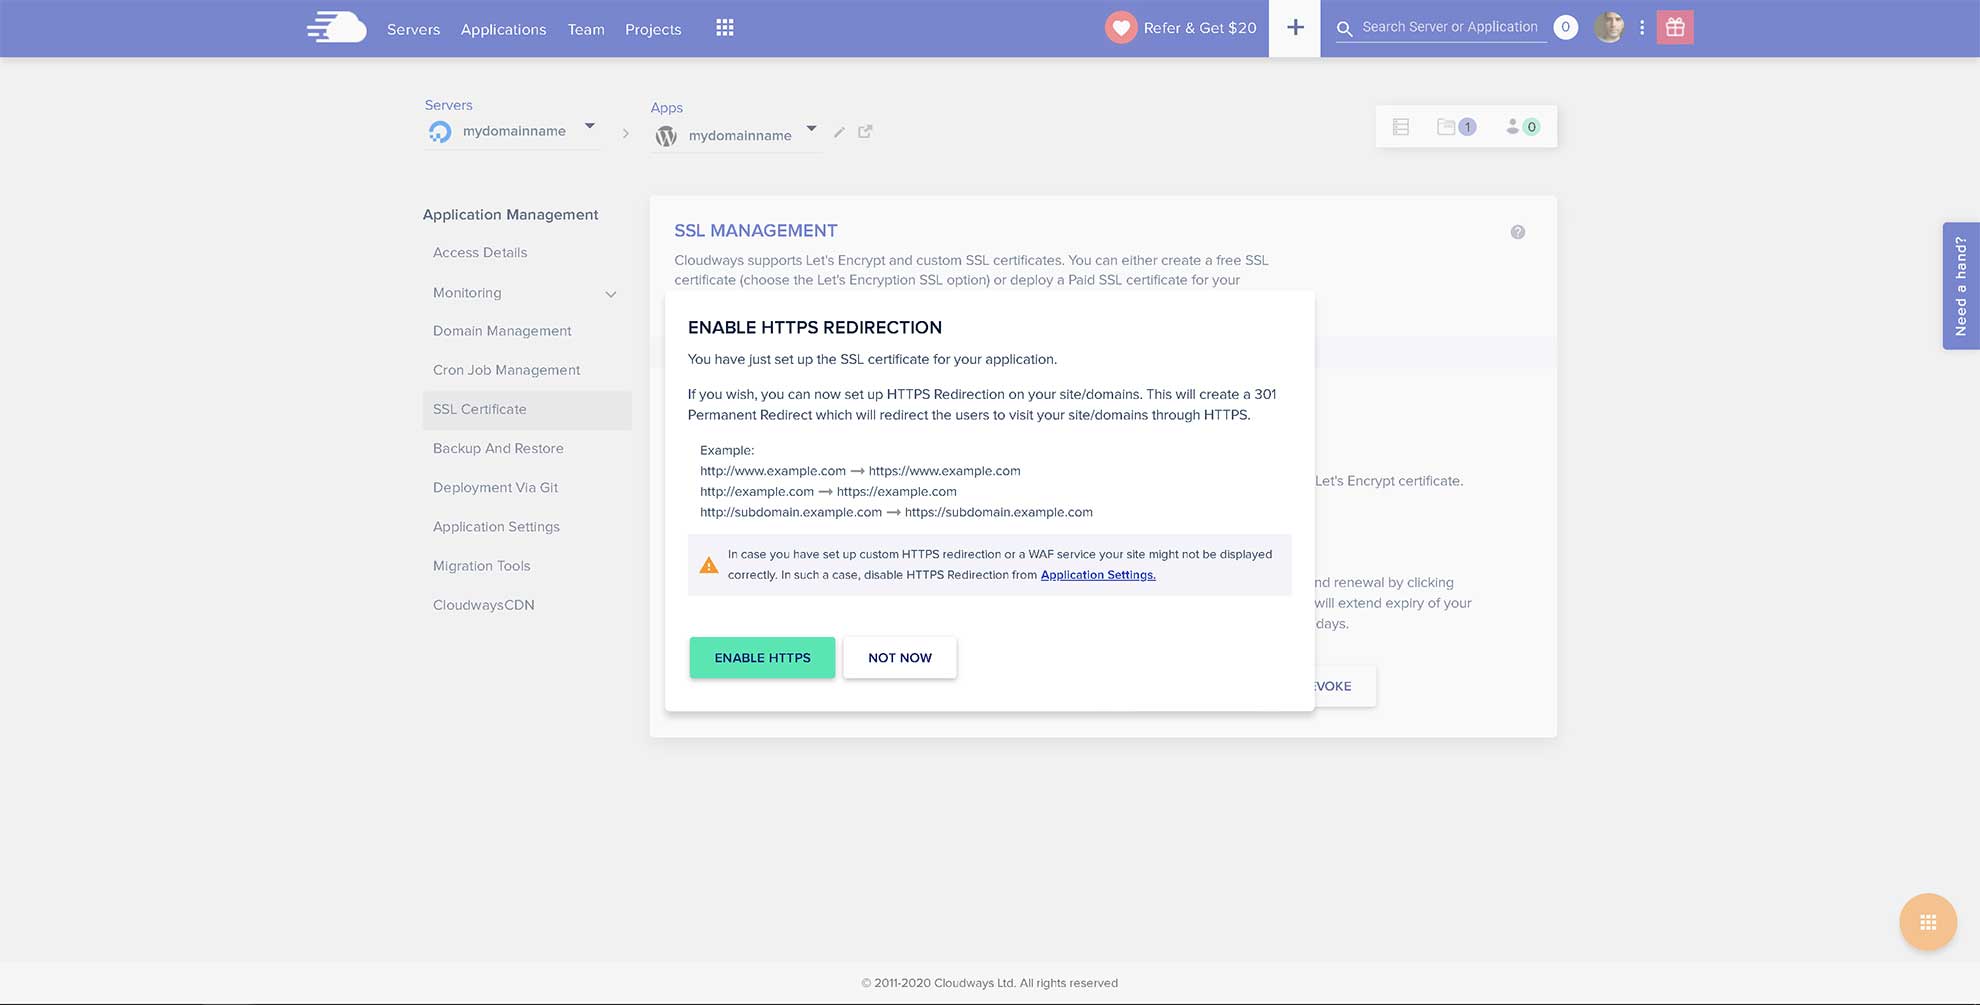
After your SSL certificate has been installed, you’ll be asked to enable HTTPS redirection or not. Always enable this. This is best practice and will automatically redirect your www domain to your non-www domain. A non-www domain looks a lot cleaner.
Note: after you’ve followed the process, you should now see a small lock icon in your browser’s address bar. It’s immediately left of your domain name. This means that you have successfully installed the Let’s Encrypt SSL certificate.
Now that you’ve registered a domain name, created a web server, and WordPress is installed, it’s time to configure some important settings.
Step 5: Configure some WordPress settings
To make sure that WordPress is set up correctly for receiving traffic, you’ll need to adjust a few settings. These settings have to do with what your site is about and the visibility in the search engines.
Follow the steps below to properly configure WordPress:
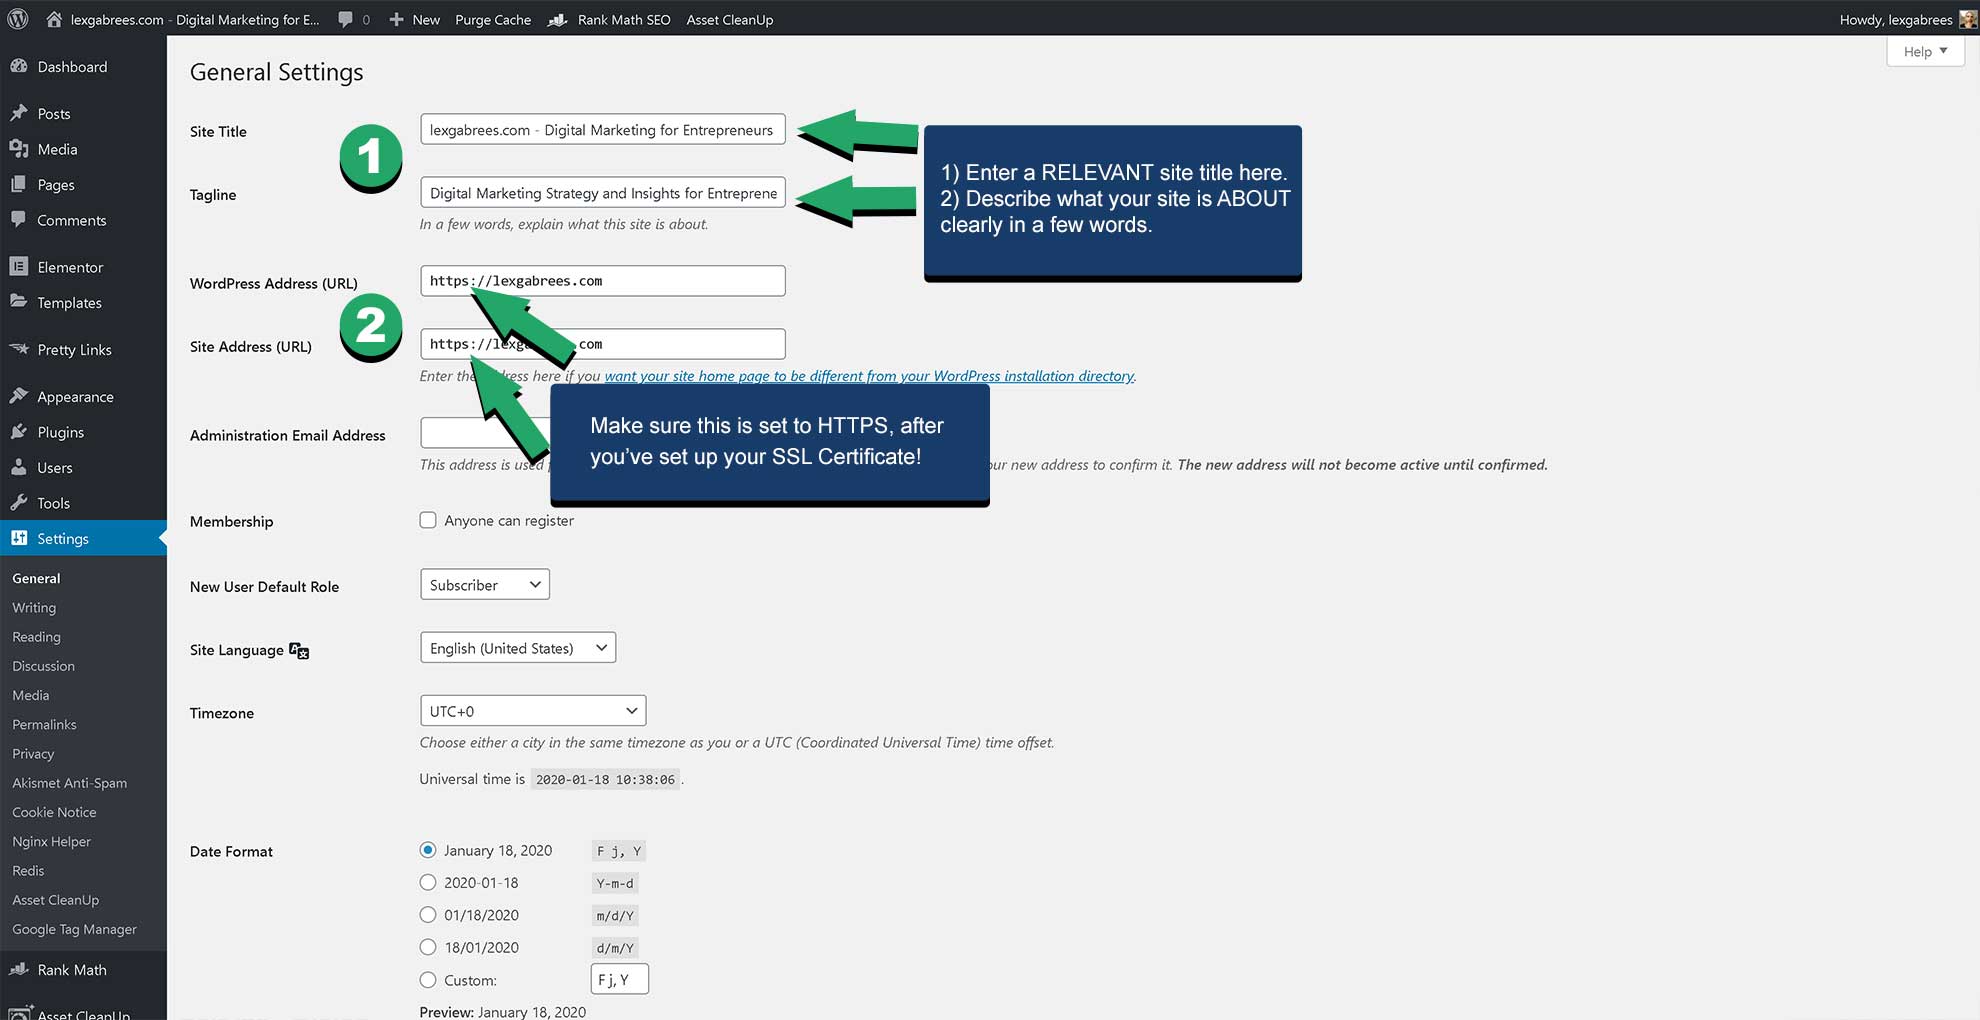
- Log in to your WordPress Dashboard at yourdomainname.com/wp-admin/
- Go to ‘Settings’. Enter your ’Site Title’ and ‘Description’
- Click ‘Save Changes’.
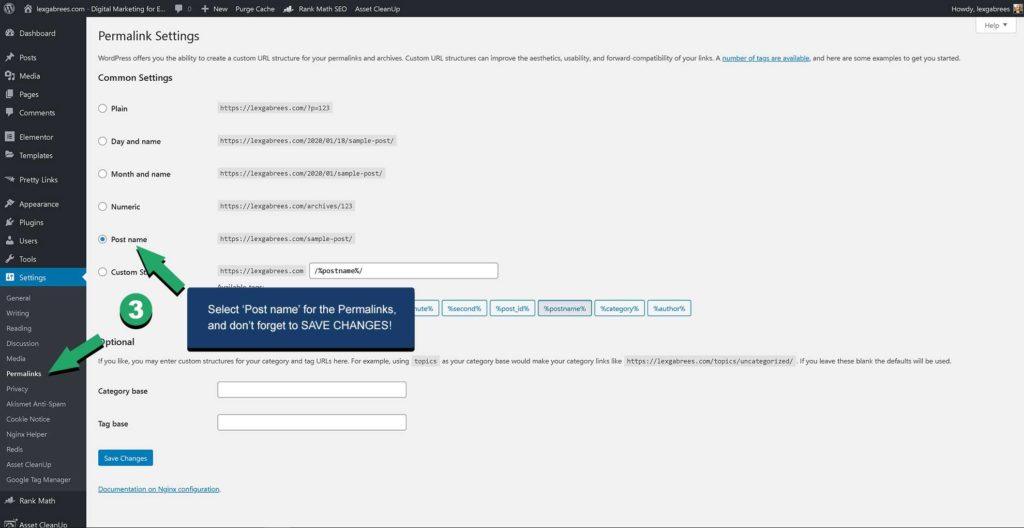
- Also under ‘Settings’, select ‘Permalinks’ and under ‘Common Settings’, select the ‘Post name’ button.
- Click ‘Save Changes’.
Step 6: Get a WordPress Theme and Page Builder
Now that you’ve properly configured WordPress, it’s time to start making WordPress look more like a website. By choosing a high-quality WordPress theme and Page Builder, you’ll be able to customize the look and functionality of your site as needed. If there are any tools you should be investing in from the start, it’s a theme and page builder.

Elementor Pro allows you to build professional landing pages and adjust how your WordPress site looks, without the need to know any programming.
Astra Pro is the Fastest WordPress theme available. It also allows you to customize how WordPress looks and offers many more options.
I use the Astra Pro Theme for all my projects. It allows me to easily and quickly customize the design of any site while being on the fastest themes available. The extra features, such as starter sites and custom layout (more about that here), also enable me to build creative marketing strategies, which aren’t possible with other themes.
Besides Astra, I also recommend investing in Elementor Pro. Using both Astra and Elementor Pro provides you with the possibility of creating almost any type of website. Elementor Pro also has features that are necessary for running an online business, like the easy-to-use form and pop-up builders, as well as a complete template system.
Step 7: Installing necessary Plugins
Plugins are the way to extend WordPress functionality. The plugins you need to install depend on the type of site you’re building and the strategies you want to execute. There are, however, a number of plugins that I recommend you always install. These bring the functionality that’s needed for your website to perform at its best.
Many plugins come in two flavors, namely a free and a Pro version. Free plugins, in most cases, are limited in features. However, in some situations, they’ll do just fine. If you’re serious about building a high-quality website, I recommend the following plugin stack:
Paid plugins I recommend
- Elementor Pro – the best page builder for WordPress
- Astra Pro theme – the fastest theme for WordPress
To install these plugins, you’ll have to purchase them from the vendor site and follow the instructions. If you have any difficulty whatsoever, don’t hesitate to contact me, or official support.
Free plugins I use:
- W3 Total Cache – speed up WordPress with this caching plugin
- Optimole – speed up WordPress with image compression
- Asset Cleanup – speed up WordPress with selective script loading
- RankMath SEO – helps you optimize your WordPress installation and content for SEO
How to install WordPress Plugins:
- Log in to your WordPress dashboard.
- Click Plugins > Add New
- Enter the name of the plugin in the search box
- Click ‘install’ to install the plugin

Now that WordPress is correctly configured and you’ve installed the necessary plugins, it’s time to set up Web Analytics. I use Google Analytics in all my projects. It’s free, very powerful, and it lets you measure the progress your site is making over time.
Step 8: Setting up Google Analytics
Measuring the performance of your website differs per type of business. If you’re starting an e-commerce shop, you’ll have different requirements than with a membership site. You should have a clear idea of what you need to measure to track the progress you are making. Only that way, you’ll know what actions you need to take to improve your results.
If you don’t know how to choose what to measure for your specific situation, have a look at how to choose the correct KPIs for your business. In that article, I’ll explain how and why businesses measure specific performance indicators. You can use the framework in that article to decide which KPIs are relevant to measure for your business.
If you’re just starting with your website, you don’t need to worry about implementing a KPI measurement plan from the start. You can configure your KPIs in Google Analytics when you have your website built and ready to receive traffic. In the meantime, what’s measured by default in Analytics can go a long way.
Next, I’ll show you how to set up Google Analytics and how to connect your site to Google Search Console, in a few simple steps.
It’s free, and it allows you to measure everything you need. Don’t be scared of Google Analytics being complex. Some plugins simplify the reports and show them directly in your WordPress Dashboard. Besides, you can always learn more about Google Analytics Later on. For now, it’s important to have it set up and have it collecting data.
To install Google Analytics on your WordPress site, follow these easy steps:
- Sign in to your Google Account (create one if you don’t have one)
- Go into your WordPress Dashboard and install the ‘Google Tag Manager for WordPress’ plugin (how to install plugins is described earlier)
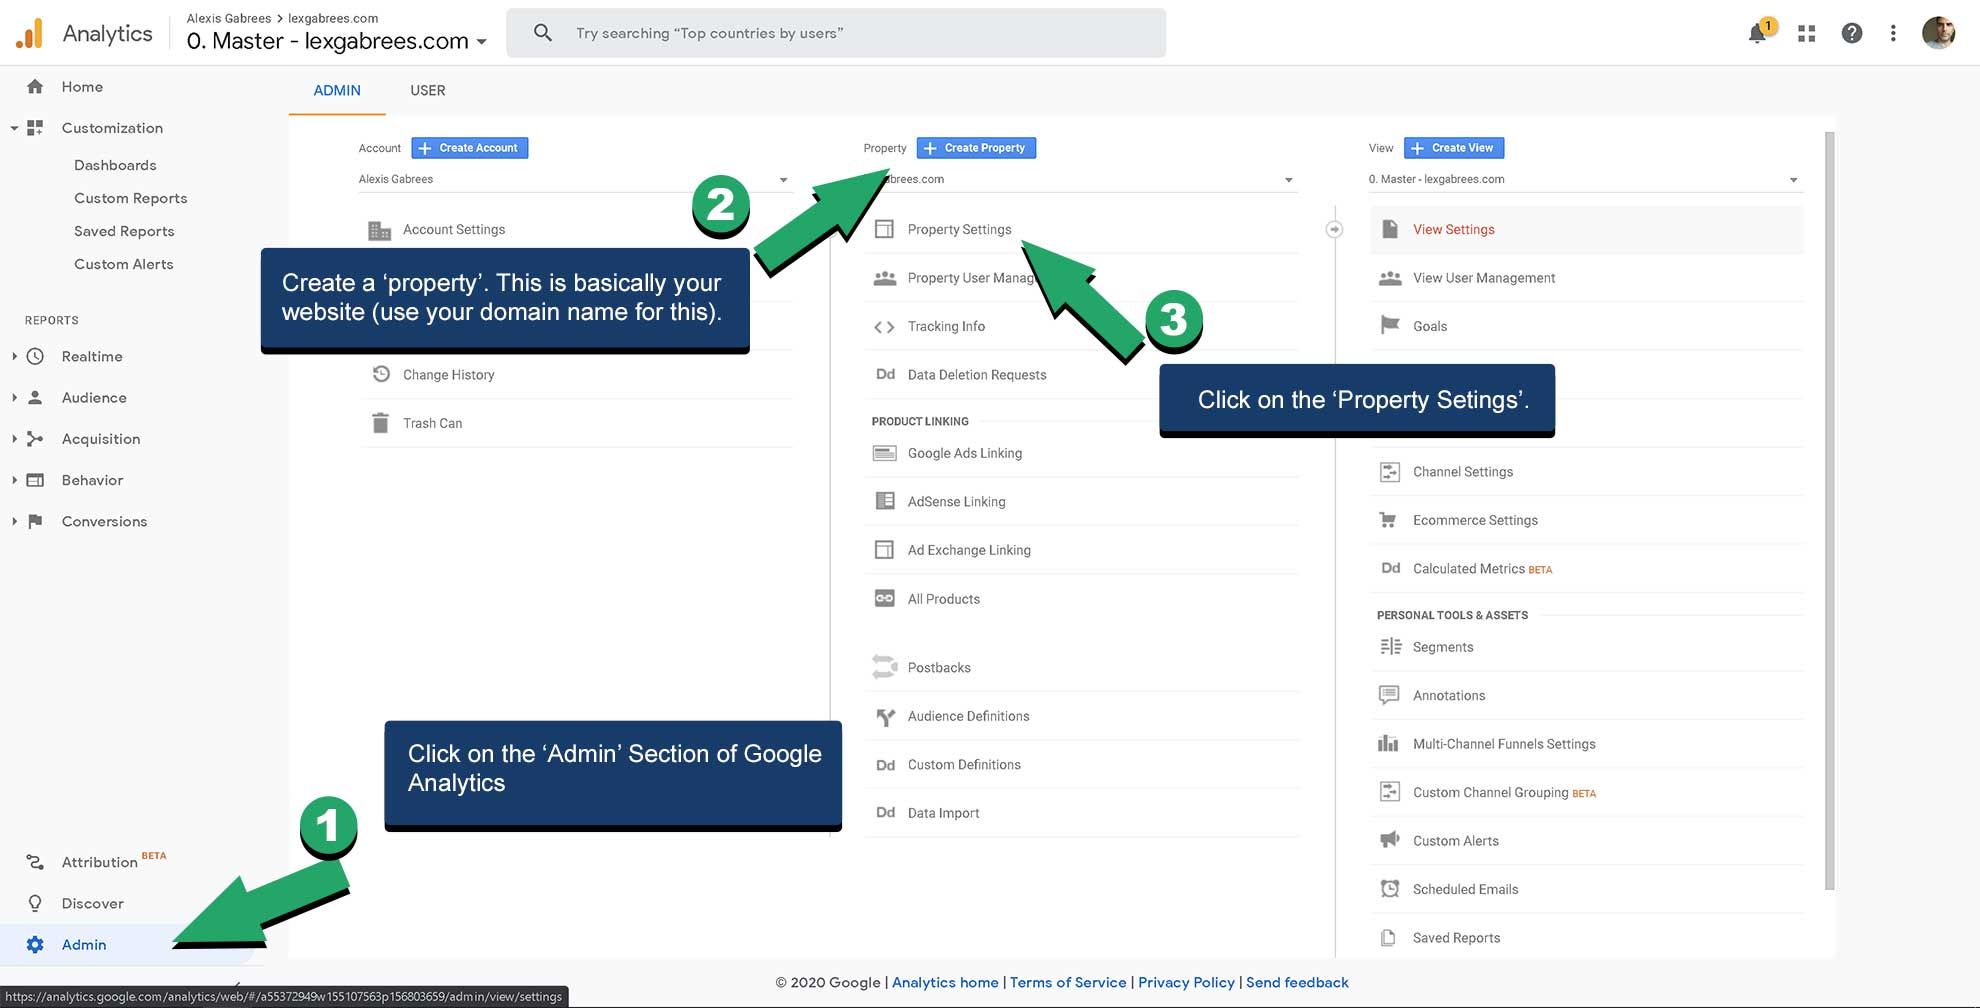
1. Click on the ‘Admin’ section
2. Create a ‘property’. Name it after your website domain name.
3. Click on ‘property settings’.
4. Enter your Tracking Code in the Input field
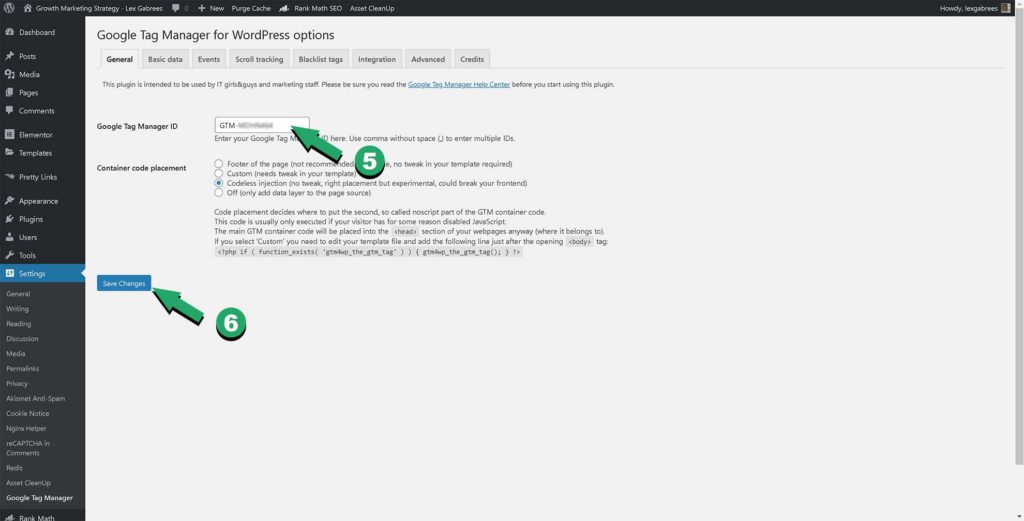
5. Enter your ‘ Tracking ID ‘. You can also add the code manually to your theme, but this is easier.
6. Click ‘Save Changes’.
After you finish the steps above, Google Analytics will start collecting data about your website.
By default, and among other things, this includes:
- The number of visitors your website receives
- The pages that are most visited, as well as how long visitors stay on a page
- The traffic channels your visitors are coming from e
- Specific characteristics they have.
Note: If you find GA to be complicated, because you’re just starting out, you might want to consider the Google Site Kit Plugin. This is a plugin that makes installing GA easy, and you’ll be able to view reports within the WordPress Dashboard. Just search for it by typing in ‘site kit google‘ in your WordPress plugin section and install it with the click of a button.
Step 9: Connect your website to Google with Search Console
Google Search Console offers additional insight into your website’s performance and search engine visibility. You’ll get access to reports about site crawling, indexing, site errors, and performance-related data. The information provided by the search console is an extremely valuable addition to your analytics reports.
To connect your site to Google Search Console, follow the steps below:
- Create a Google Account (if you don’t have one) and log in to Google Search Console
- Follow the steps below the images
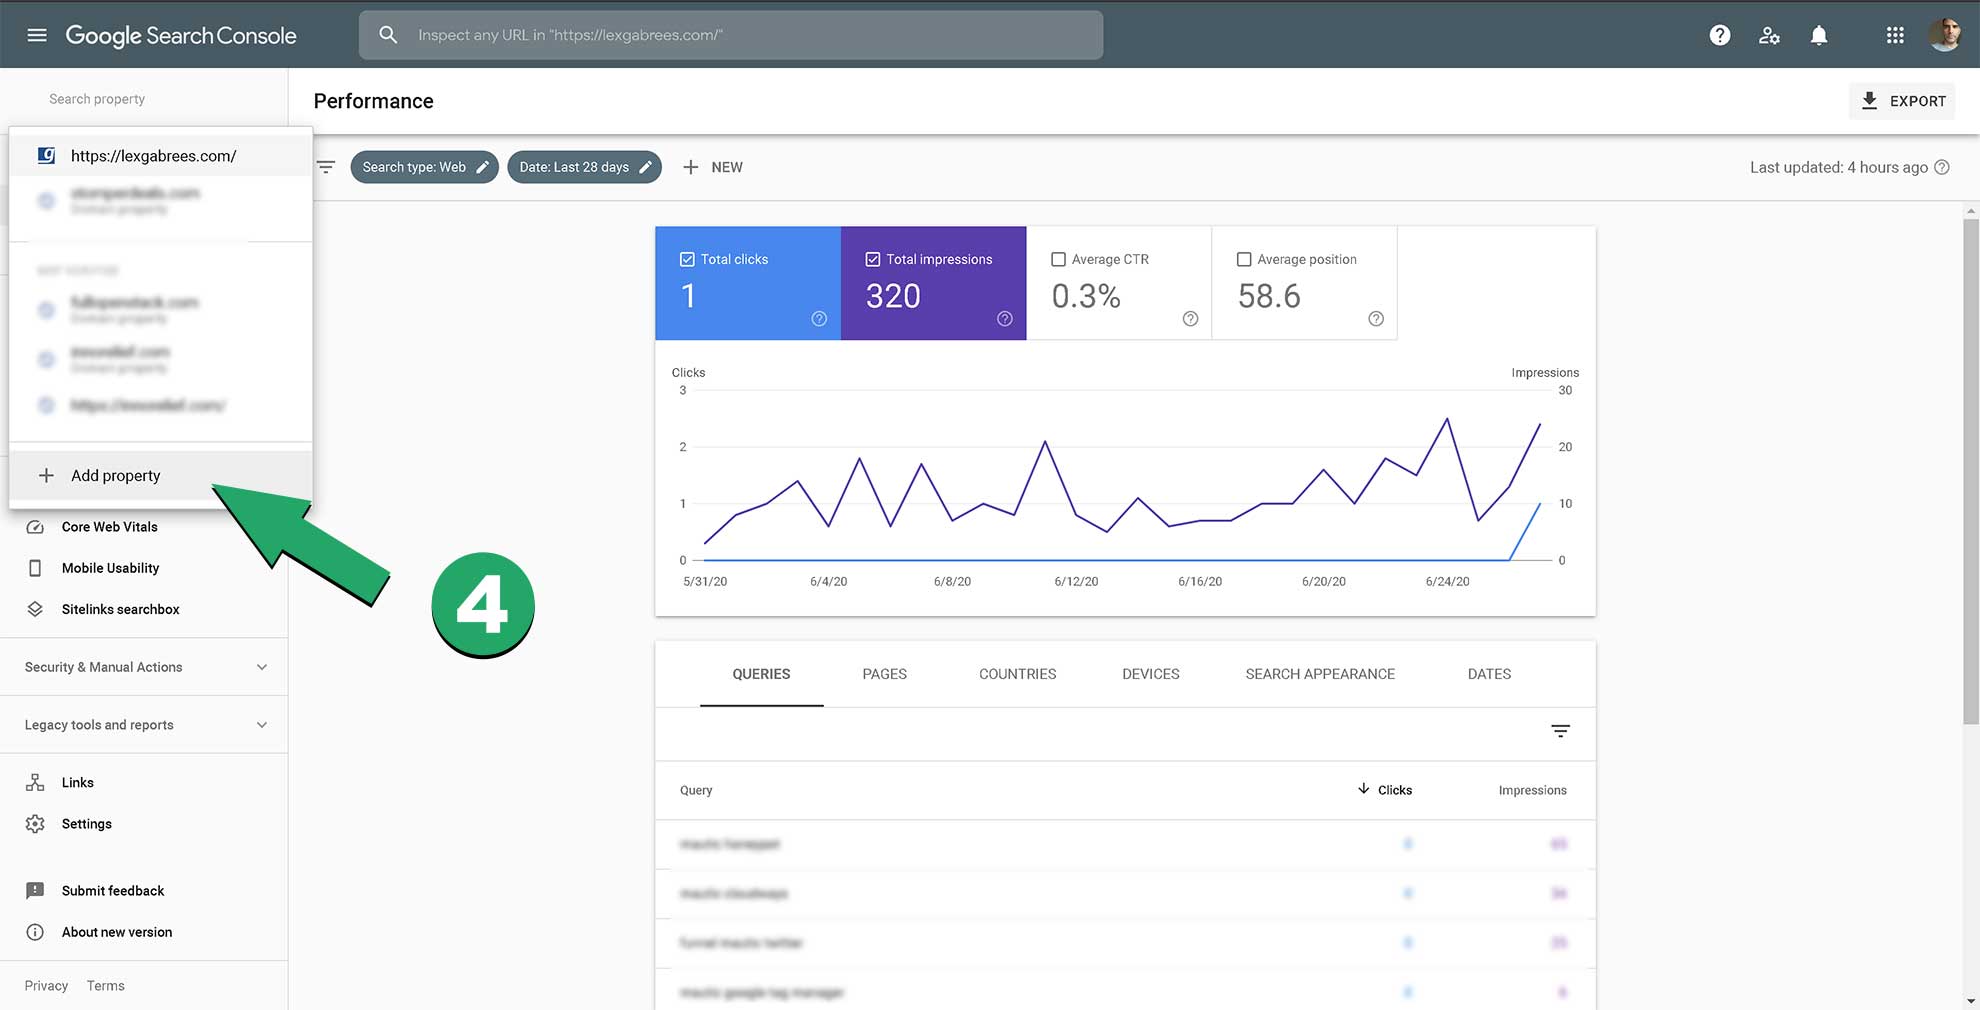
4. Click ‘Add property’. This property is the domain name of your WordPress Website.
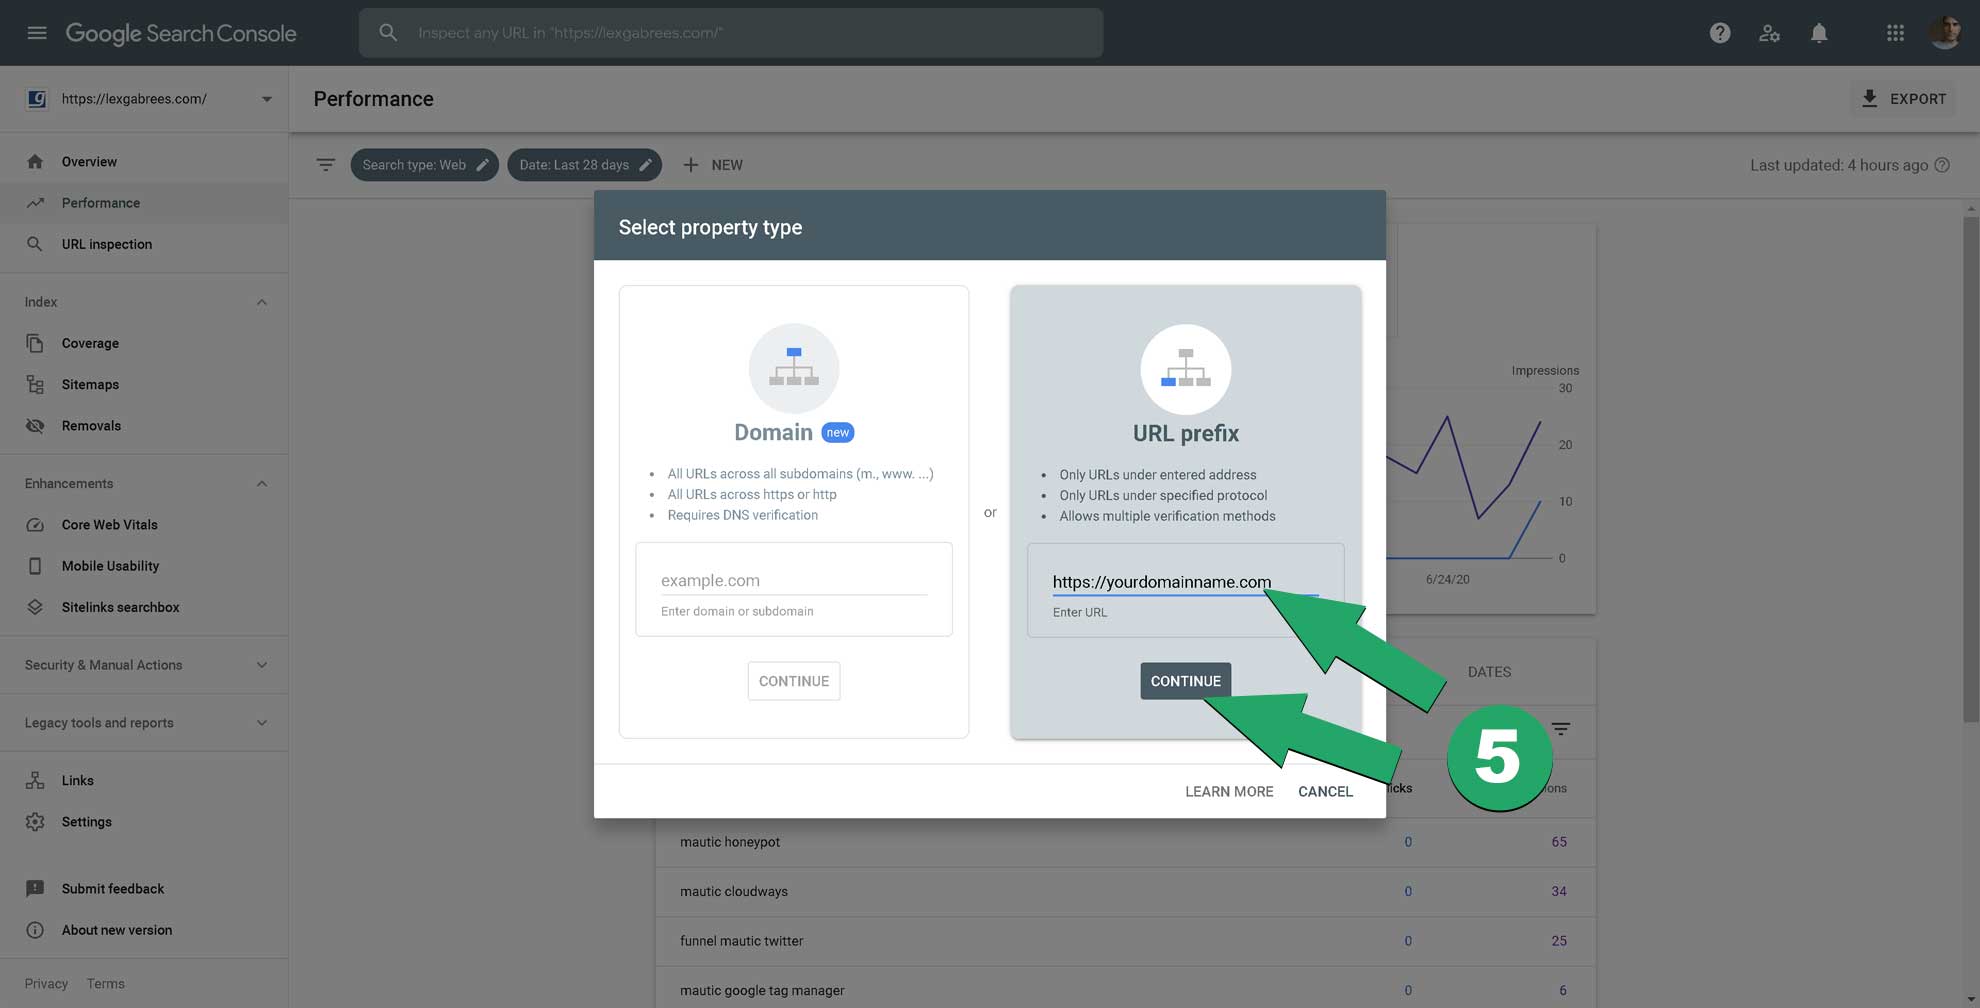
5. Select your verification method. You can choose Google Analytics or a DNS verification method.
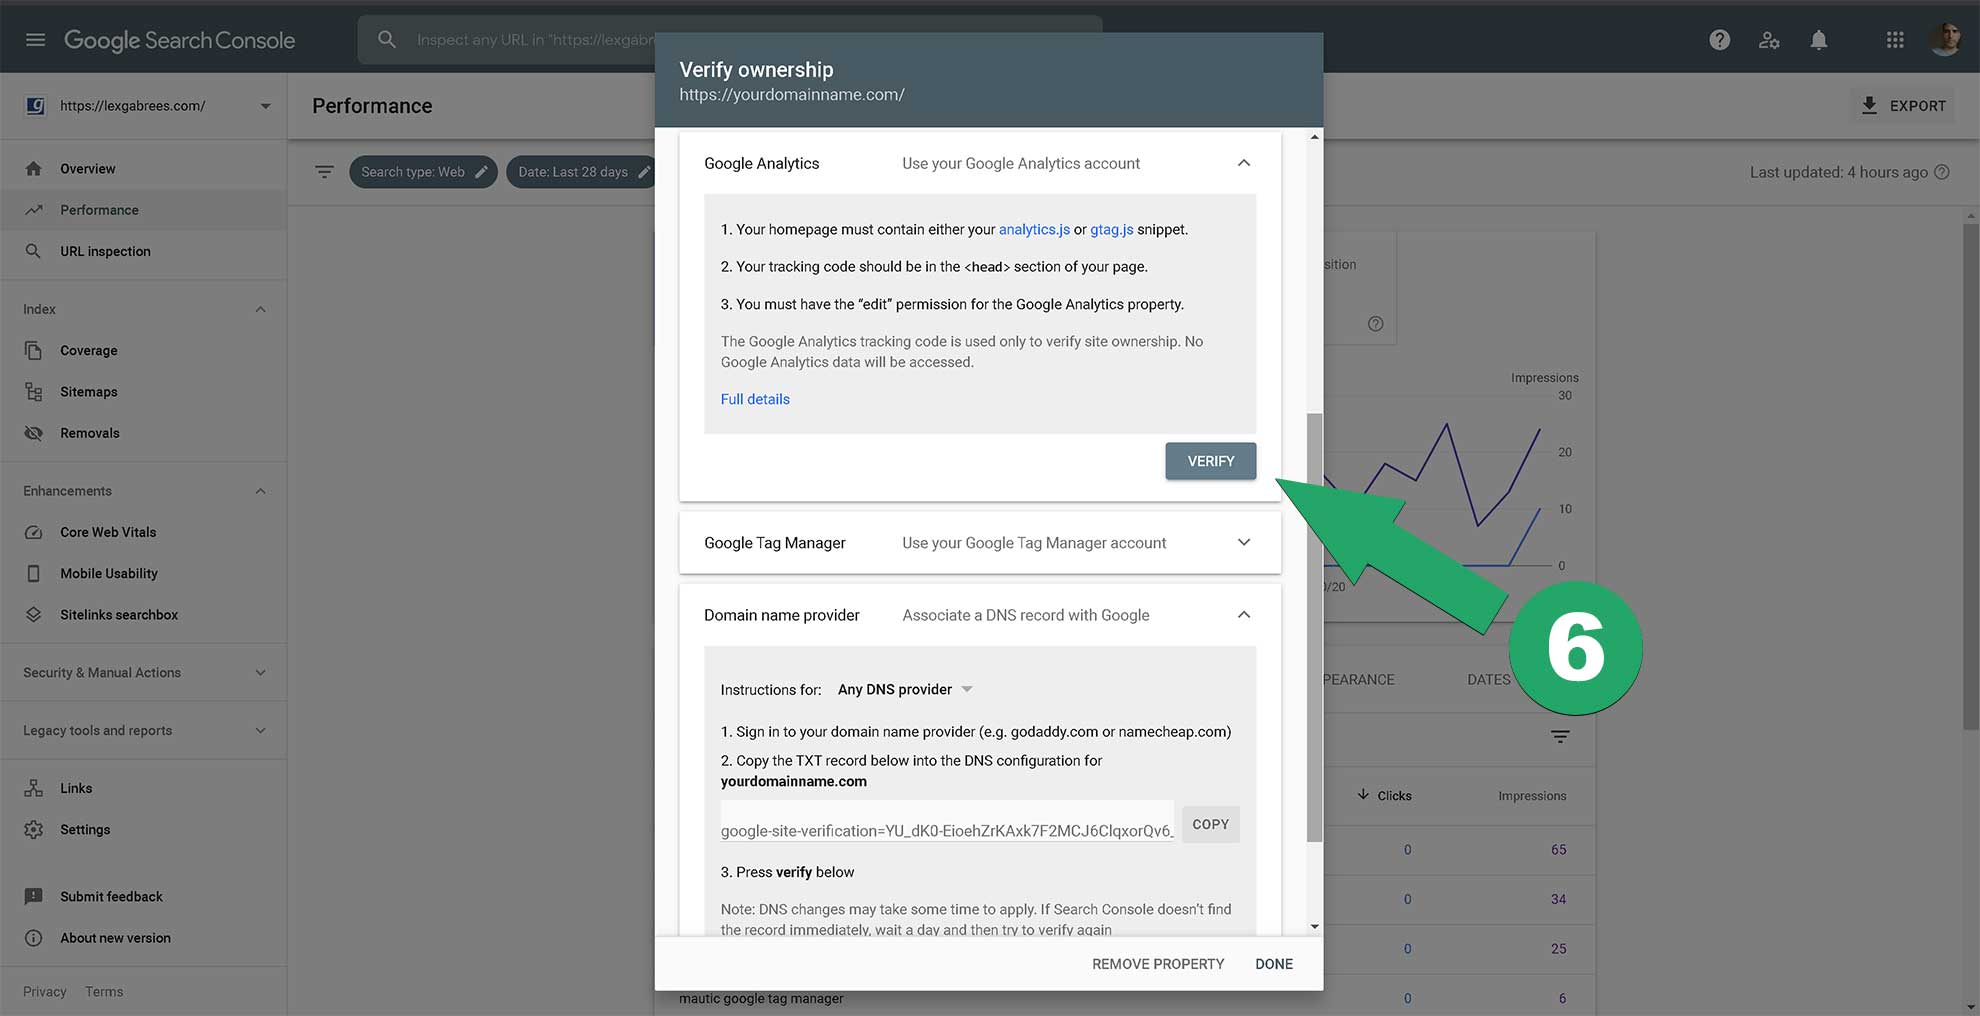
In the verification method, you can choose to verify through your Google Analytics account. This is a quick and easy option if you’ve followed the section about how to install Google Analytics earlier.
Note: If you decided not to install GA yet, it’s best to verify your Google Search Console property (or website) through the DNS system. In that case, you’ll have to go back into your Namecheap account (see the section about DNS configuration) and follow the instructions given to you by the Google Search Console. This method of verification involves adding a TXT record to your Namecheap DNS configuration.
After you’ve connected your website to the Google Search Console, you can log in to start viewing the reports in the dashboard.
Step 10: Link Search Console to Google Analytics
It’s good practice to link the Google Search Console to Google Analytics. This will make the information that’s provided by the console available in Google Analytics. This way, you don’t have to log into two different dashboards to view the reports. It makes visiting your performance reports a little bit less tedious.
To link Google Search Console to Google Analytics, follow these simple steps:
- Log in to your Google Analytics Account and click ‘Admin.‘
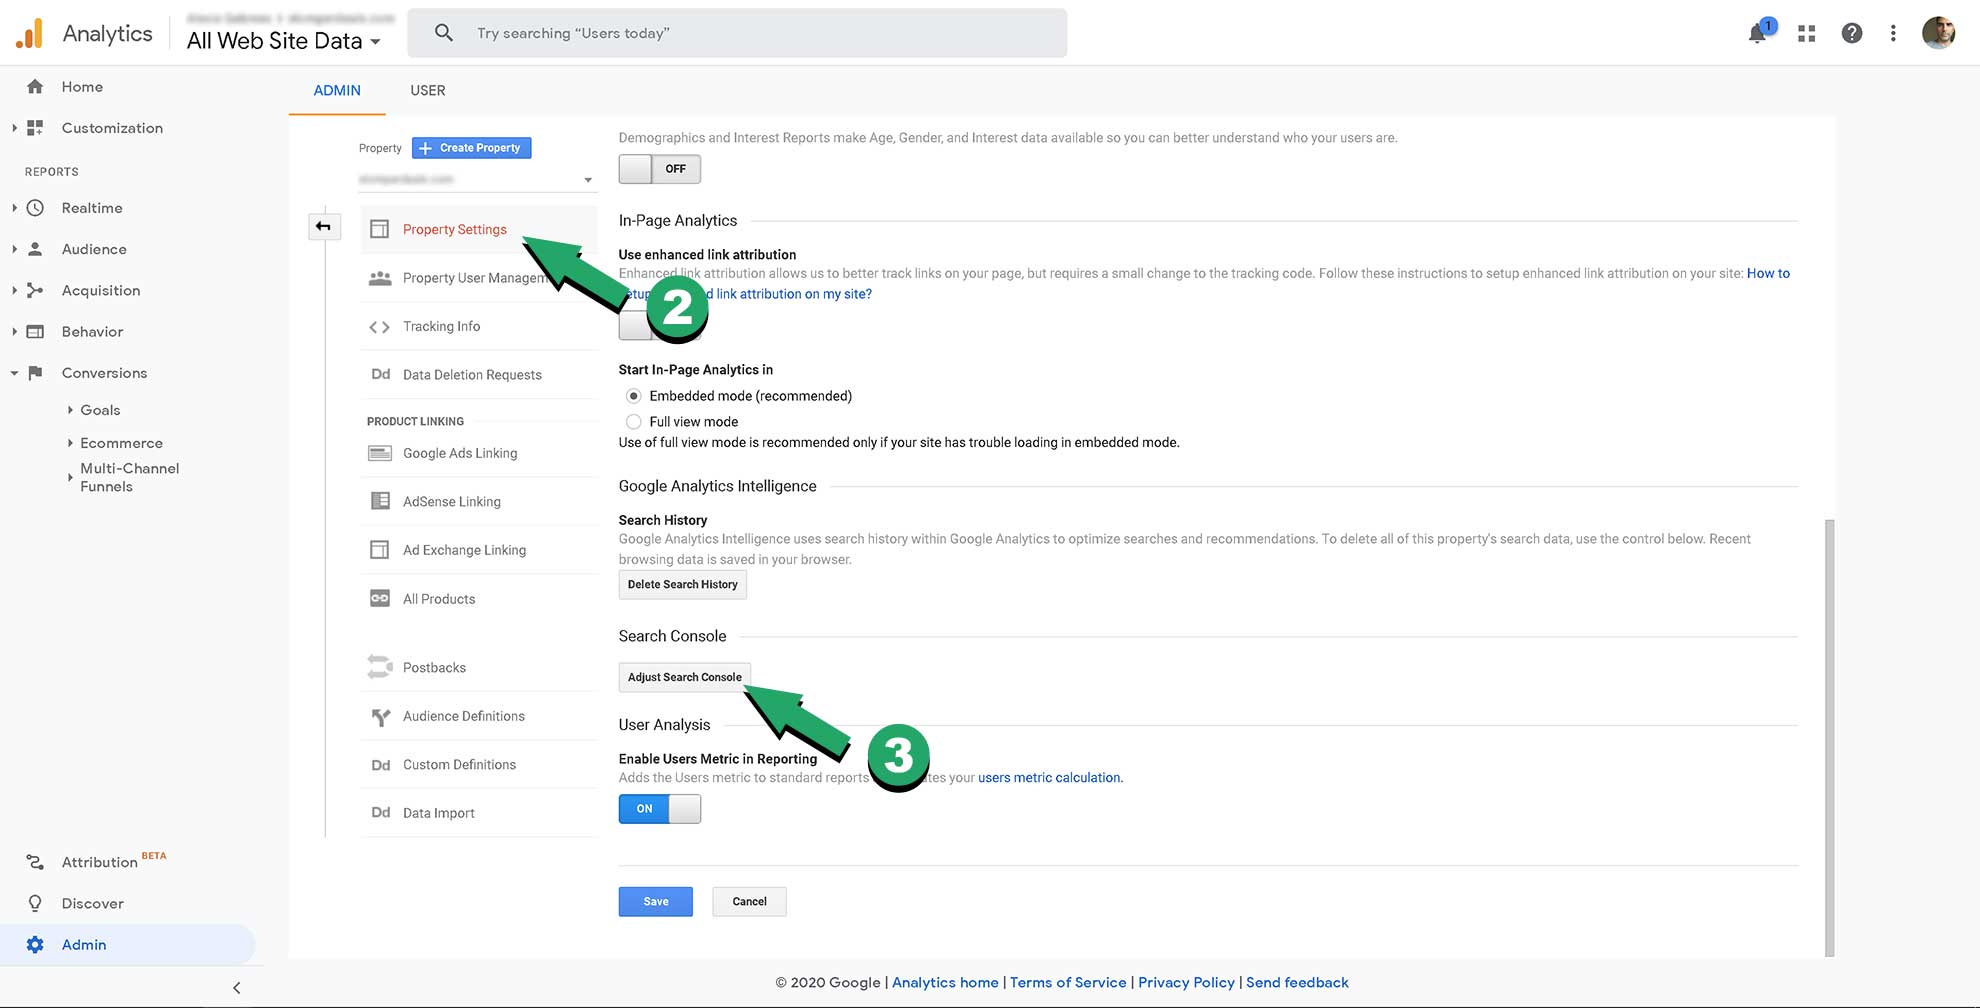
2. Select ‘Property Settings.‘
3. Scroll down to the ‘Search Console’ section and click it

4. Click ‘Add‘ Search Console and follow the instructions
The steps listed above and how to configure Google Search Console data to show up in your Google Analytics report can also be found in the official Google Analytics help pages.